Deus Ex Walkthrough – Airbase
- Introduction
- Liberty Island
- Battery Park
- Hell’s Kitchen
- Warehouse District
- Mole Tunnels
- Airbase
- 20th Street Warehouse
- Secret MJ12 Facility
- MJ12 Helibase
- Tonnochi Road
- VersaLife
- Hell’s Kitchen 2
- Naval Shipyards
- Cemetary
- Paris Catacombs
- Champs Elysses
- Chateau DuClare
- Cathedral
- Vandenberg
- Gas Station
- Sub Base
- Missile Silo
- Area 51
- Conclusion
- Saves
NYC - Helibase
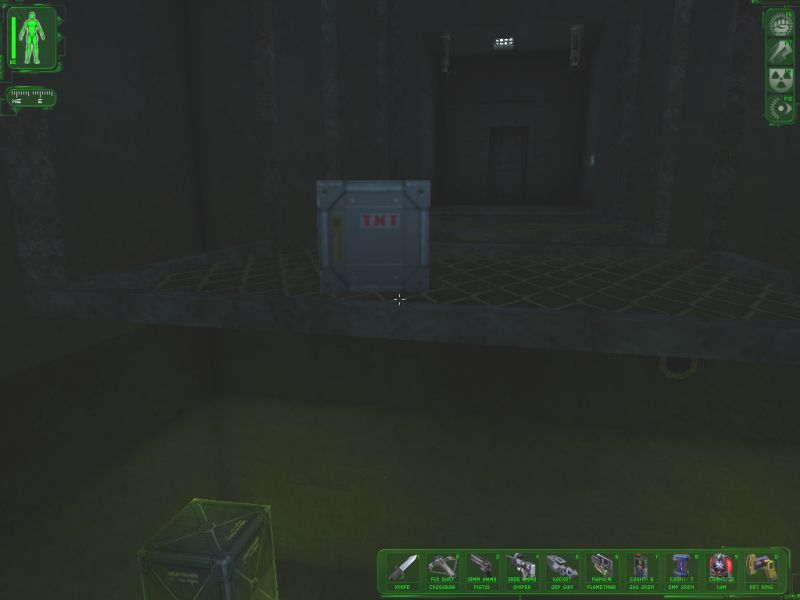
When you reach the water pick up the 1 EMP grenade which is just inside one of the pipes on the right. Take the left path and carry one of the small boxes with you. Throw the box so that it blocks the lowest of the red lasers and then hurry back around the corner to avoid the turrets. When the alarm has stopped, duck under the lasers and climb to the top of the wall. Once you are across the wall, keep going east. Avoid the camera in the next area and kill the 1 NSF terrorist there, taking his nanokey. Use it to open the next door. Push one of the medium sized boxes in a similar manner to before so that it blocks the lower lasers and hide until the alarm stops. Press the button to extend the bridge. Now you have to cross the water, but beware - the wire mesh parts of the bridge collapse soon after you jump on them. To make it more difficult, you should also carry the TNT crate across with you. To do this, first move the TNT (push it) to the edge of the part of the bridge which you just extended. Now, while crouching, lift the TNT and throw it across onto the next section. The next part is hard. You have to jump across next to the TNT, crouch, pick up the TNT, throw it onto the next section, and then repeat this until you are clear of the water, all quickly enough that the bridge doesn’t fall down with you still on it:
Now go through the door in front of you, pushing the TNT as you go. Continue down the corridor. Disarm the 1 EMP grenade on the wall when you reach it and pick it up. Push the TNT all the way through the door at the far end of the corridor. Over to the East you should see 2 enemy bots on patrol through a low passage in some rock. While they are not looking, place the TNT crate in between their paths approximately in the middle of the area so that they both pass by the crate at the same time. You may have to do this in stages: push the TNT part way there and then hide while the bots go past, then push it a little further before hiding again… Once the TNT is in position, use your pistol to fire 1 round of 10mm ammo at the crate as the bots are passing it so that the 2 security bots are destroyed. Go through the opening in the North East corner of this room. You will get 50 skill points in the next room, and there is also a datacube on the left under some pipes. Go through these doors and the next ones. You will get another 100 skill points for having found some more Ambrosia. The crates next to the Ambrosia have nothing of any interest to you.
Avoiding the NSF terrorist in the first large room and the camera above the door, go first to the left. In the 2 rooms on the lower level you will find 1 bioelectric cell in one and 6 rounds of 10mm ammo in the other. There will be 1 NSF terrorist whose patrol route involves checking these rooms. Kill him. If you can’t see him, just wait for a minute or so and he will come to where you are. When he dies it is very likely that other terrorists will come to investigate what happened. There are a further 2 NSF terrorists on this side of the base. Regardless of whether they come to find you or you meet them later, kill them when you see them. None of them have any ammo that you can pick up. You may also attract the attention of some others from other parts of the map, in which case just kill them too. Go across the main foyer to the other side and deal with the NSF terrorist in the men’s restroom. He is carrying a nanokey for you to collect as well as 3 +/- 3 rounds of 10mm ammo. Now take out the NSF terrorist who comes down from the upper level after hearing you kill the one in the toilets. You can take 2 +/- 2 tranquilizer darts" from him. Make your way back across the foyer and this time go up the stairs. Ignore the first locked door on the left, but turn to the left after passing it. The next door may already be open if you had previously got the attention of the terrorist who was inside, if not you can open it with the nanokey and then deal with the terrorist.
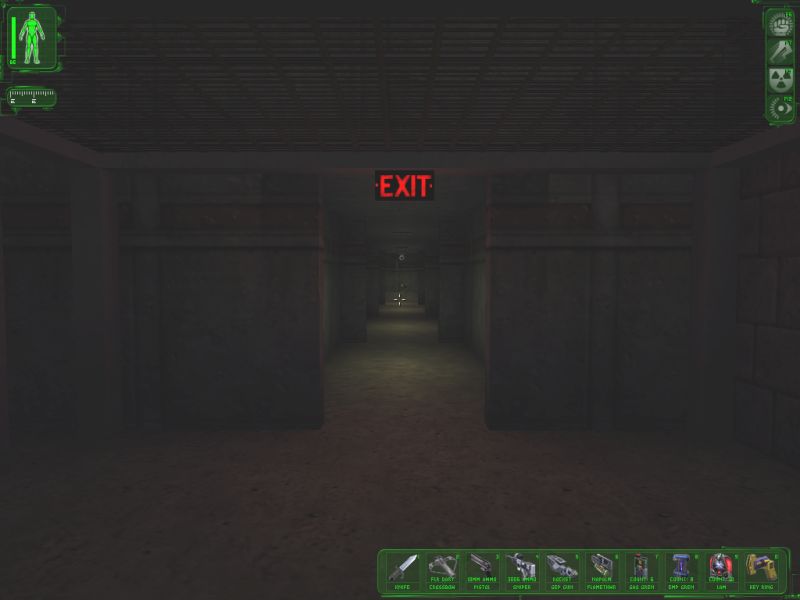
You will find a datacube in here. Use the security computer terminal to switch off the cameras and open and unlock the door and set the turret to enemies. Now find the switch hidden behind a houseplant in the corner of this room. Press it and a secret room opens up. 75 skill points are your reward for finding the area. Apply the range weapon modification to your pistol and use the augmentation upgrade to upgrade your speed enhancement augmentation. There are 4 darts here as well. Now that the security cameras have been disabled, go back through the foyer to the other side and up the stairs. You may find that one of the bookcases is already open revealing another secret area. If not you can use the pinball machine on the right to open it. You don’t need anything in the crates, but go inside the secret area anyway because you will get 50 skill points. Hack the ATM and you can withdraw 1125 credits. There is 1 bioelectric cell on one of the shelves. Once again cross to the other side of the foyer and this time open the first of the locked doors on the upper level with the nanokey. Go up the ladder, open the hatch and kill the NSF terrorist who is walking around near there. Then climb the long ladder in the Southeast corner and kill the NSF terrorist sniper. You can approach the sniper without him noticing you if you are careful. He will provide you with 3 +/- 3 rounds of 30.06 ammo. Go back down the ladder and down the 2 more ladders to the North until you are on the ground floor of the helibase. Use stealth to take out all the remaining NSF in the base. How many there are will depend on how many you had killed inside the office part of the base. If you killed the same number that I had mentioned then there will now be 6 NSF terrorists left. You cannot pick up anything from them (you should by now have the full 150 rounds of 10mm ammo already). Once they have been taken care of, climb up to the walkway which is directly opposite the one that the sniper you killed was on. Drop down onto the crate from there and take the 1 rocket round. Leave through the passage marked ’exit’ and go up the lift at the end:
NYC - Airfield
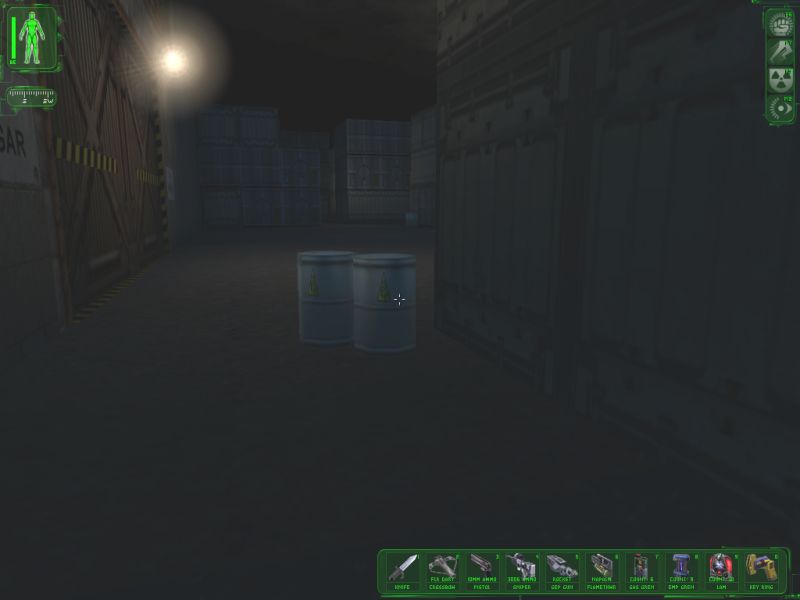
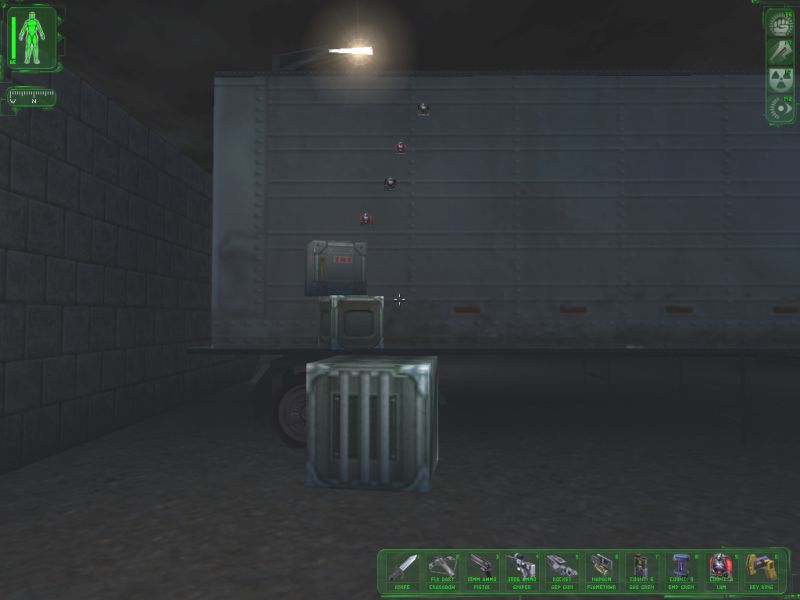
You get 100 skill points as you exit the lift and come out into the airfield. There is a datacube on the box nearby. Go through to the large area in the South West. There are 3 security bots patrolling this immediate area. It is possible to destroy these without using any ammo at all (and I don’t mean slashing one with a knife then hiding round a corner and repeating a few hundred times until they die!). There are many explosive barrels around here. You will wait until the bots are near them and then detonate the barrels to take out the bots. If necessary pushing the barrels into better positions beforehand. The way to detonate the barrels is to carry a small metal crate up the ladders on the sides of the large storage containers and then drop the crate onto the explosive barrels from above as the bot goes past the barrel. I am not going to describe exactly which barrels to use where and which ladders to climb up, as this can be done many different ways. Hopefully my description is enough for you to work out how to do this for these 3 bots. I will just give a few screenshots to help you:
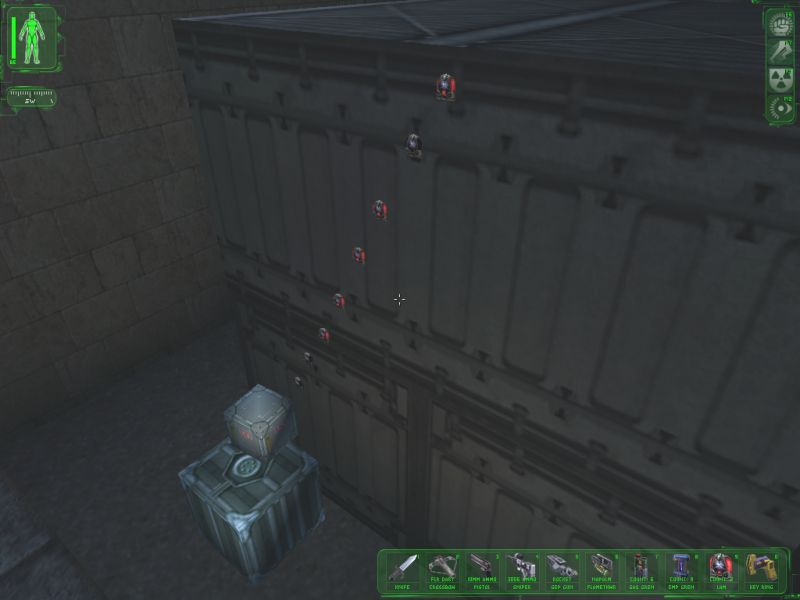
Once the bots have been dealt with head Southwest keeping close to the wall on the right. You will come to the back ends of two trucks. There is 1 NSF terrorist whose patrol route takes him to these trucks. Kill him and take the nanokey that he is carrying. Further South there is a door leading out to some water. Kill the NSF terrorist inside there. He is also carrying a nanokey. You will have got 100 skill points for finding the last Ambrosia container. There is a datacube and a further nanokey on a metal crate and one of the wooden crates contains 1 bioelectric cell. You will notice that there are 3 TNT crates floating in the water. Push one of the crates towards the edge of the water in the loading bay, exit the water and then you can pick the crate up out of the water. If you are having difficulty moving the crates while they are in the water, it may help if you stand on one of them and lift another up, then throw it into the water. Now you will be able to move it. Carry it around to where the trucks are. Now use the nearby crates and you LAMs to create the following staircase structure up the side of one of the trucks:
Climb up so that you are standing on the lowest of the LAMs and pick up the TNT crate. Carry the crate up the LAMs to the top of the truck. You can now pick the LAMs up again. From here throw the TNT over the back end of the trucks (towards the wall) so that it detonate as it lands and blows open the doors to both the trucks. Inside the trucks you will find 12 Sabot rounds in one and 4 tranquilizer darts in the other. Now grab a second TNT crate from the water and return with it towards where you came out of the lift from the helibase. To deal with the security bot here, set up a similar LAM ladder going up the side of the large storage container in the Southeast:
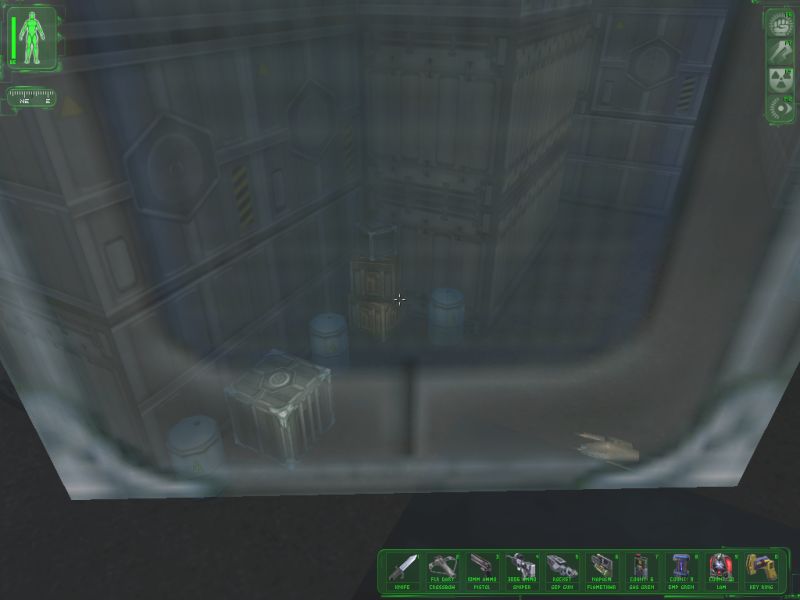
Use it to carry the TNT crate up to the top of the storage container from which you can throw it down on the security bot as it passes you below. Now look to the East and you will see an enclosed area in which there is a lot of electrical disturbance. I will describe how to get in there, take all the useful items and then get back out again without using up any of your inventory items at all (and losing no health and as little bioelectric energy as is possible). I suppose you could justifiably claim that this is excessive and a waste of time. If so then feel free to blast the door down with a rocket, run in to grab the items and then run out before you lose too much health and energy. However if you would like to try my method, then read on. First you should push the nearby medium sized metal crate right up to the wall of the enclosure. Now use the LAM climbing method described earlier in the walkthrough to get up to the top of the wall and again to help you up to the top of the wire fence above the wall. Drop down so that you are crouching on the top of the cylinder furthest to the South:
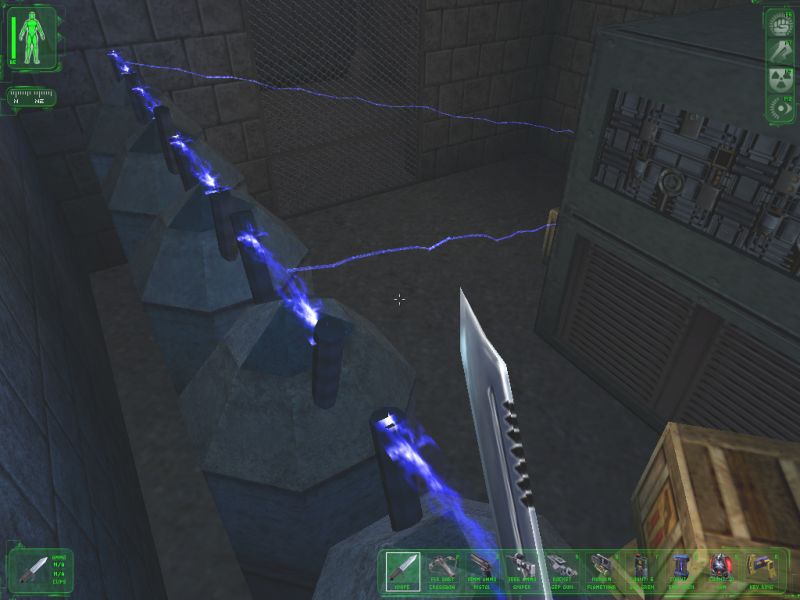
It is inevitable that when you drop all the way to the ground you will lose some bioelectric energy, however this drain of energy will stop as soon as you break open one of the crates (if you open the crates before dropping then you will continue to lose energy as long as you remain in the area, so don’t bother trying). The best way to proceed is therefore to drop down between the South wall and the stack of two crates in front of you. Make sure that you remain crouched all the time. As soon as you land, break open the bottom crate with your combat knife. You should now stop losing energy. Sometimes this is temperamental and you may have to open the other crate as well before you stop losing energy. However it is in fact possible to achieve this without losing any energy at all. The way I managed it was by jumping down onto the crates, smashing both of them as I landed. The reason I do not advise you to do the same is that I have had great difficulty reproducing it. You may have to reload many times trying this before it will work for you. Normally if you break the crates by jumping on them you tend to continue to have your energy drained anyway, whereas the method of dropping to the side and then smashing them always seems to work. One of these crates contained a clip weapon modification. Apply this to your pistol. Now crawl along the base of the cylinders until you are in line with the nearer of the other 2 crates in the enclosure. Slowly crawl towards it until you can pick it up. Do so and then take it back into the South corner away from the electrical arcs. Open it to find 1 EMP grenade. Crawl back to where you got the crate from and approach the last crate from the West. It is possible to pick up this crate and carry it back to the South corner without losing any health as well. Do not open the crate (there is nothing useful inside), but rather drop it next to the gap between the wall and the large box of machinery in the enclosure. Jump (still while crouching) onto this crate. Now you can stand if you want. Place 3 LAMs on the wall to create some steps that you can jump up. When you are ready, jump onto the lowest of your LAMs and, as quickly as possible, proceed across them until you are standing on the highest of the LAMs:
The reason for this is that if you were to simply use the standard method for climbing wall with the LAMs, you would find that you lose energy after jumping onto the lowest LAM and the next LAM, and you only stop losing energy after you have reached your third LAM. Therefore, by placing all 3 LAMs to begin with and then jumping up to the highest one quickly, it is possible to do this without losing any energy at all. Now you can remove the lower LAMs and continue as normal to climb the wall. Jump across onto the top of the box of machinery when you are high enough and then continue to climb to the top of the fence to the East. Once you are on the top, walk along the wall until you are above the metal crate that you moved into position earlier. N.B. Yes you could access the outside of the map here by dropping down the other side of the perimeter wall, but there is nothing useful for you there! Drop down onto the wall from the fence and then onto the metal crate. This prevents you from taking any damage in the fall. Finally you have finished with the enclosure!
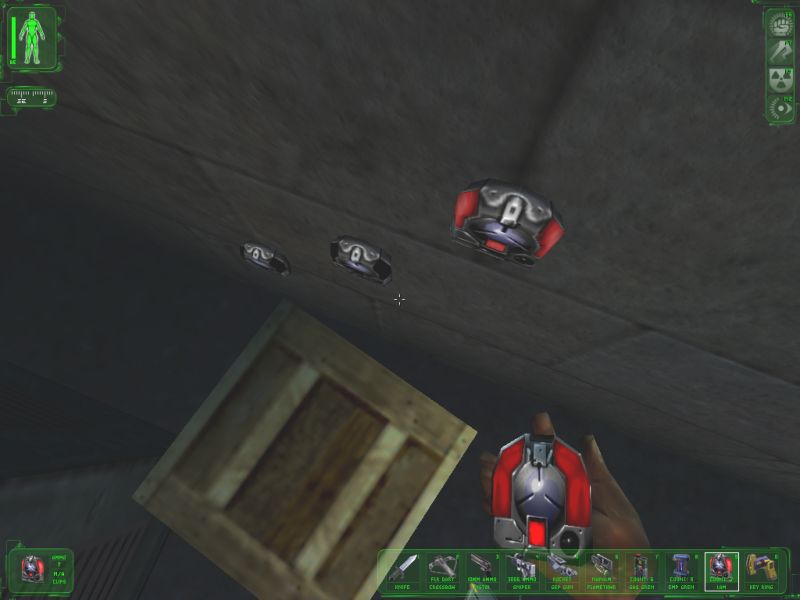
Now that you have acquired the nanokey for the security towers, you can access all of them (the fortified buildings in all the corners of the airfield). Begin with the one in the Northeast. You must equip yourself with the nanokey and then run straight for the door. As soon as you are at the door, unlock and open it and then run inside. It is possible to do all this before the turrets have a chance to start firing at you. Climb up the ladder and hack the security computer terminal. Switch off the cameras and set the turrets to enemies. There is a recoil weapon modification for you in here. Apply it to the sniper rifle. Exit the security tower. Do the same for the tower to the West of this one. You will find 1 gas grenade in here. The next tower along (to the Southwest) does not contain anything useful. Head back to the water. There is one last security bot here. This time, wait until it isn’t facing you, and enter the security tower in the Southwest corner. After you have switched the turrets to enemies, they will kill the security bot the next time it passes them. There is a sniper rifle in this tower, from which you can get 6 rounds of 30.06 ammo. Exit the tower and go East. Take out the 3 NSF terrorists by the South and East gates. They are all carrying the same nanokey (which you already have). One of them also has 1 gas grenade. Find the ladder going up the side of one of the storage containers here, climb up it and the next one. Jump across to the nearby container:

Continue to jump across the successive containers (it should be obvious which one to jump to each time). All the jumps are possible without activating the speed enhancement augmentation. One of the crates that you pass contains an accuracy weapon modification. Apply it to your sniper rifle. Go down the ladder in front of you and drop down to the ground so that you are facing the East gate. Use your nanokey to open the gate access control box and then press the button. Go through the gate. Walk around to the East side of the building and you will find 2 terrorists. Kill 1 NSF terrorist and immediately run past the other to the security tower. Once inside, switch off the cameras and set the turrets to enemies. The turrets may or may not kill the other NSF terrorist. If they don’t, then kill him yourself. Go through the doors into the building (the barracks). There is 1 NSF terrorist on the upper level and one more NSF terrorist in the kitchen. Kill them both. As before, all 4 of these terrorists are carrying the same nanokey, but nothing else for you. Find the dart board in the main room and take the 3 darts. Now look at where the wall meets the floor to the left of the dart board. Press the uneven brick. A secret area will open. Go through to get 25 skill points. Pick up the nanokey, 6 rounds of 30.06 ammo and the mini-crossbow to get 4 tranquilizer darts. You will notice that there is also a scope weapon modification here, but all your weapons which can have scopes fitted already have them! So you will have to leave this weapon modification here. Go up the stairs and use the nanokey to open the locked door. Inside there are 4 boxes. One of them is unlocked and you will find a datacube inside it. Break open the West window in this room.
Return through the East gate to the water and collect the last of the TNT crates. In order to move this one to the edge of the water you may need to push a barrel into the water from the side and push it until it is next to the TNT. Then stand on the barrel, pick up the TNT crate and throw it back into the water. Then you can push the TNT to the edge of the water and pick it up from the side. Carry the TNT into the room with the locked boxes. Temporarily put it down by the window, step up onto the edge of the window and then pick up the TNT again. Now throw the TNT into the middle of the room whilst dropping yourself backwards out of the window. The TNT crate should explode, opening all the locked boxes, without damaging you at all. Inside the boxes you will find 1 bioelectric cell and 4 darts. Use the code you got from the datacube to go through the door which is controlled by a keypad just outside this room. You get 50 skill points as you go through.
NYC - Hangar
Enter the hangar and you will be told by Paul that he has joined the NSF. From now on the NSF are no longer your enemies! After speaking to Paul, go over to the trucks in the hangar. One of them has a datacube lying in it. The other has an accuracy weapon modification inside one of the crates which you can find in it. Apply this to your pistol. Speak to the mechanic who is under the plane and buy the recoil weapon modification from him for 400 credits. Apply this to your pistol too. Get on board the plane.
NYC - 747 Airplane
Turn left and keep going until you reach some stairs. First go up to the top level. You will find a nanokey in this room. Return down the stairs and now go all the way to the bottom level. You will get 100 skill points for finding the last barrel of Ambrosia. You can also use the repair bot to recharge your bioelectric energy level. Get back to the middle level of the plane and continue South. You can open the locked doors with your nanokey. Lebedev is in the room right at the end of the plane. You will find a datacube under his bed. Speak to Lebedev. Anna Navarre will now run to meet you and tell you to finish the job by killing Lebedev. Instead, speak to Lebedev again. At this point there are 3 options. You could kill Lebedev as Navarre tells you, but that is against UNATCO policy. You could speak to Lebedev some more, in which case Anna Navarre will kill him and be disappointed in you. Or you could realise that Lebedev and Paul are right and then kill Anna Navarre. No matter what happens, one person will die. At the moment they are both tentatively designated as friendly characters by your crosshair. The way to decide what to do is by considering the skill points. If you kill Lebedev you get none, letting Anna kill him (by leaving the room) gets you none, letting Anna Navarre kill him (after speaking to him more) gets you 175, and killing Anna Navarre gets you 200 skill points. Therefore the choice is obvious. When you kill Anna Navarre her body will explode, so immediately run out of the room after slashing her with the knife to avoid losing any health. Head back down to the lower level of the 747 where you can now use the code from the datacube to open the containment field in which there is an augmentation canister. In order to pick it up, you should make room by dropping your combat knife. Leave the airplane.
NYC - Hangar
The hangar is now occupied by UNATCO troopers, exit into the barracks.
NYC - Airfield
Head for the helipad by the lift. Jock is waiting for you there. You can speak to Gunther Hermann on the way if you wish. Board Jock’s helicopter and fly back to base.
NYC - Liberty Island
Temporarily drop your flamethrower by the helicopter and pick up the crowbar which is by the communications van. Enter the van using the same code as before and collect the 12 Sabot rounds from the desk. As before, it is possible to climb out to the rest of the island from here again, but there is no need. The only thing out there is a crate with a lockpick inside which is located on the 2nd walkway level around the statue, but you already have 20 lockpicks. Now go inside the HQ.
NYC - UNATCO HQ
Walk through the HQ until you reach level 1. You can take 1 bioelectric cell from the office on the right. Go down to your own office on level 2 and you will discover that there is a recoil weapon modification hidden under your desk. Fit it to your sniper rifle. Go to see Manderley in his office. He will give you 1000 credits. You can also take a reload weapon modification from behind the bin in his lavatory. You should apply it to your sniper rifle like the last one. Go through the conference room and into the break room where you will find Jaime Reyes talking to Walton Simons. Speak twice to Simons and then twice to Jaime just to get some more information from them. You can hack the ATM here again and withdraw 1125 credits. Go down to the medical room on level 3 and use the medical bot to install the EMP shield augmentation from the canister you have been carrying. Open the closet door with your nanokey and you will find 1 bioelectric cell in one of the crates. There is also an augmentation canister here, but you cannot use it since you already have the speed enhancement augmentation installed. You can now speak to Alex Jacobson in computer ops, but there is nothing in his secret area this time round. Go back up to level 2 and fire 1 rocket round at the cabinet in the conference room with your GEP gun. The nearby UNATCO troopers may hear this and come to kill you, but just hide until they give up looking. You can now pick up the 4 darts, 1 bioelectric cell and 6 rounds of 30.06 ammo from the cabinet. Go to see Sam Carter in the armoury and ask for 1 rocket round when he offers you ammo. Leave the UNATCO HQ.
NYC - Liberty Island
When you reach the helicopter, drop the crowbar and pick the flamethrower back up again. Now you can board Jock’s helicopter.
Statistics
| Items | Minimum Collected | Maximum Collected | Used Up / Dropped |
|---|---|---|---|
| skill points | 850 | n/a | 0 |
| credits | 3250 | n/a | 400 |
| weapon modifications | 8 | n/a | 8 |
| accuracy | 2 | n/a | 2 |
| clip | 1 | n/a | 1 |
| range | 1 | n/a | 1 |
| recoil | 3 | n/a | 3 |
| reload | 1 | n/a | 1 |
| augmentations | 1 | n/a | 1 |
| augmentation upgrades | 1 | n/a | 1 |
| datacubes | 7 | n/a | n/a |
| nanokeys | 14 | n/a | n/a |
| enemies killed | 25 | n/a | n/a |
| Anna Navarre | 1 | n/a | n/a |
| NSF terrorists | 17 | n/a | n/a |
| security bots | 7 | n/a | n/a |
| ammo total | 65 | 87 | 2 |
| darts | 15 | 15 | 0 |
| EMP grenades | 3 | 3 | 0 |
| gas grenades | 2 | 2 | 0 |
| rocket rounds | 2 | 2 | 1 |
| rounds of 10mm ammo | 1 | 5 | 1 |
| rounds of 30.06 ammo | 18 | 24 | 0 |
| Sabot rounds | 24 | 24 | 0 |
| tranquilizer darts | 0 | 12 | 0 |
| other important items | 7 | n/a | 0 |
| bioelectric cells | 7 | n/a | 0 |