14 minutes
Mount Agung Hike
Hiking, especially up mountains, is perhaps my favourite active past-time, however I don’t often get the opportunity considering I live in London and have two small children. So I decided to jump at the chance to climb Mount Agung during our recent family holiday to Bali - an active volcano over 3000m high. Hiking up Mount Agung requires a guide, not just because of the difficulty of the hike, but also for local cultural reasons, and it is apparently now mandatory by law. All trekking companies that arrange guides for Mount Agung seem to offer “sunrise treks”, which involve starting the ascent at around midnight, using head torches, and reaching the top in time for sunrise. The logic is primarily that the views from the summit are best at sunrise, often entirely free from clouds and thus providing visibility of most of the island of Bali, and beyond.
However I was not keen on the idea of hiking at night-time, as much of my enjoyment is derived from observing everything around me during the hike itself (more so than I care about having the best possible view from the summit), so I was determined to find a guide who was willing to take me up during daylight hours. There are two popular routes up the mountain, with the guides typically offering either route, but always there-and-back. I was struggling to make up my mind which route would be more enjoyable, and instead came to the conclusion that I wanted to go up one route and down the other. Most trekking companies completely ignored me when I tried to describe my desired route. Clearly there is the logistical issue that you can’t simply drive to the start point and then leave the vehicle there if you are returning elsewhere, but that is hardly insurmountable.
The common routes are:
Pasar Agung - Start at the car park beneath Pura Pasar Agung, at an elevation of around 1550m. This route is consistently particularly steep, but it is both the shorter route (only around 2 miles in each direction) and involves less elevation gain. It usually involves reaching the crater rim at a location that is not actually the highest point, but provides great views of the crater. However there is an alternative path that splits off about two-thirds of the way up to traverse the mountain somewhat before a final ascent to the true summit.
Besakih - Start at the car park next to Pura Pengubengan, at an elevation of around 1170m. This is more often known as the Besakih route (the name of a nearby large and very important temple complex). Due to the lower elevation of the starting point, the total height climbed when taking this route is greater, but at the same time, the horizontal distance is almost twice that of the Pasar Agung route, so it is not quite as steep on average. This route heads all the way to the summit.
I have always enjoyed steep ascents, especially if they involve scrambling, but am well aware that going back down a steep route is often more challenging than going up. So for that reason I decided it would make most sense to start at Pura Pasar Agung, climb to the true summit via the less common variation of that route, and then return via the Besakih route to Pura Pengubengan.
After unsuccessfully reaching out to a number of trekking companies, I found one guide who was happy to accommodate my request for the unusual route during the daytime - Wayan Tegteg. In fact he is somewhat of a local legend, being the oldest and most experienced guide for Mount Agung. He has been climbing the mountain multiple times per month for decades, and at the age of 70 has reached the summit over 1000 times. He did warn me that he is “a slow guide”, but that sounded perfect as I am not as fit as I was 10 years ago, which is roughly how long it has been since I regularly hiked up hills / mountains, and I would much prefer to take in all the scenery and enjoy the hike than rush up as quickly as possible and feel absolutely destroyed before even reaching the top.
I had not planned this hike before arriving in Bali, so had not brought my hiking equipment with me from the UK. Thankfully I did have appropriate footwear (a new pair of The North Face Hedgehogs), but other than that I just had an ancient rucksack and clothing that was clearly unsuitable. So literally the day before the hike, I went to ICON mall in Sanur (very close to where we were staying) to buy all the clothes I needed, plus water and snacks for the hike. I ended up buying pretty much all the clothes from Uniqlo, as they had a good selection at decent prices.

Trying on clothes in Uniqlo
The evening before the hike was stressful as I had planned to go to sleep by 8pm, but the driver I had arranged to take me to/from the hike start/finish points suddenly cancelled at the last minute, just as I was about to go to bed, and it was very difficult to find a replacement at such short notice. Thankfully everything was sorted in the end, and I eventually got to sleep at around 11pm. My alarm was set for 3:15am the next morning, with pickup at 4am. I tried to get some extra sleep on the drive, and we also picked up the guide on the way. Eventually reaching the start point at around 5:45am, my guide provided me with a hiking pole and some additional food: a large sandwich (3 slices of bread, and two different fillings), 2 apples, 2 bananas, and 2 hard-boiled eggs.
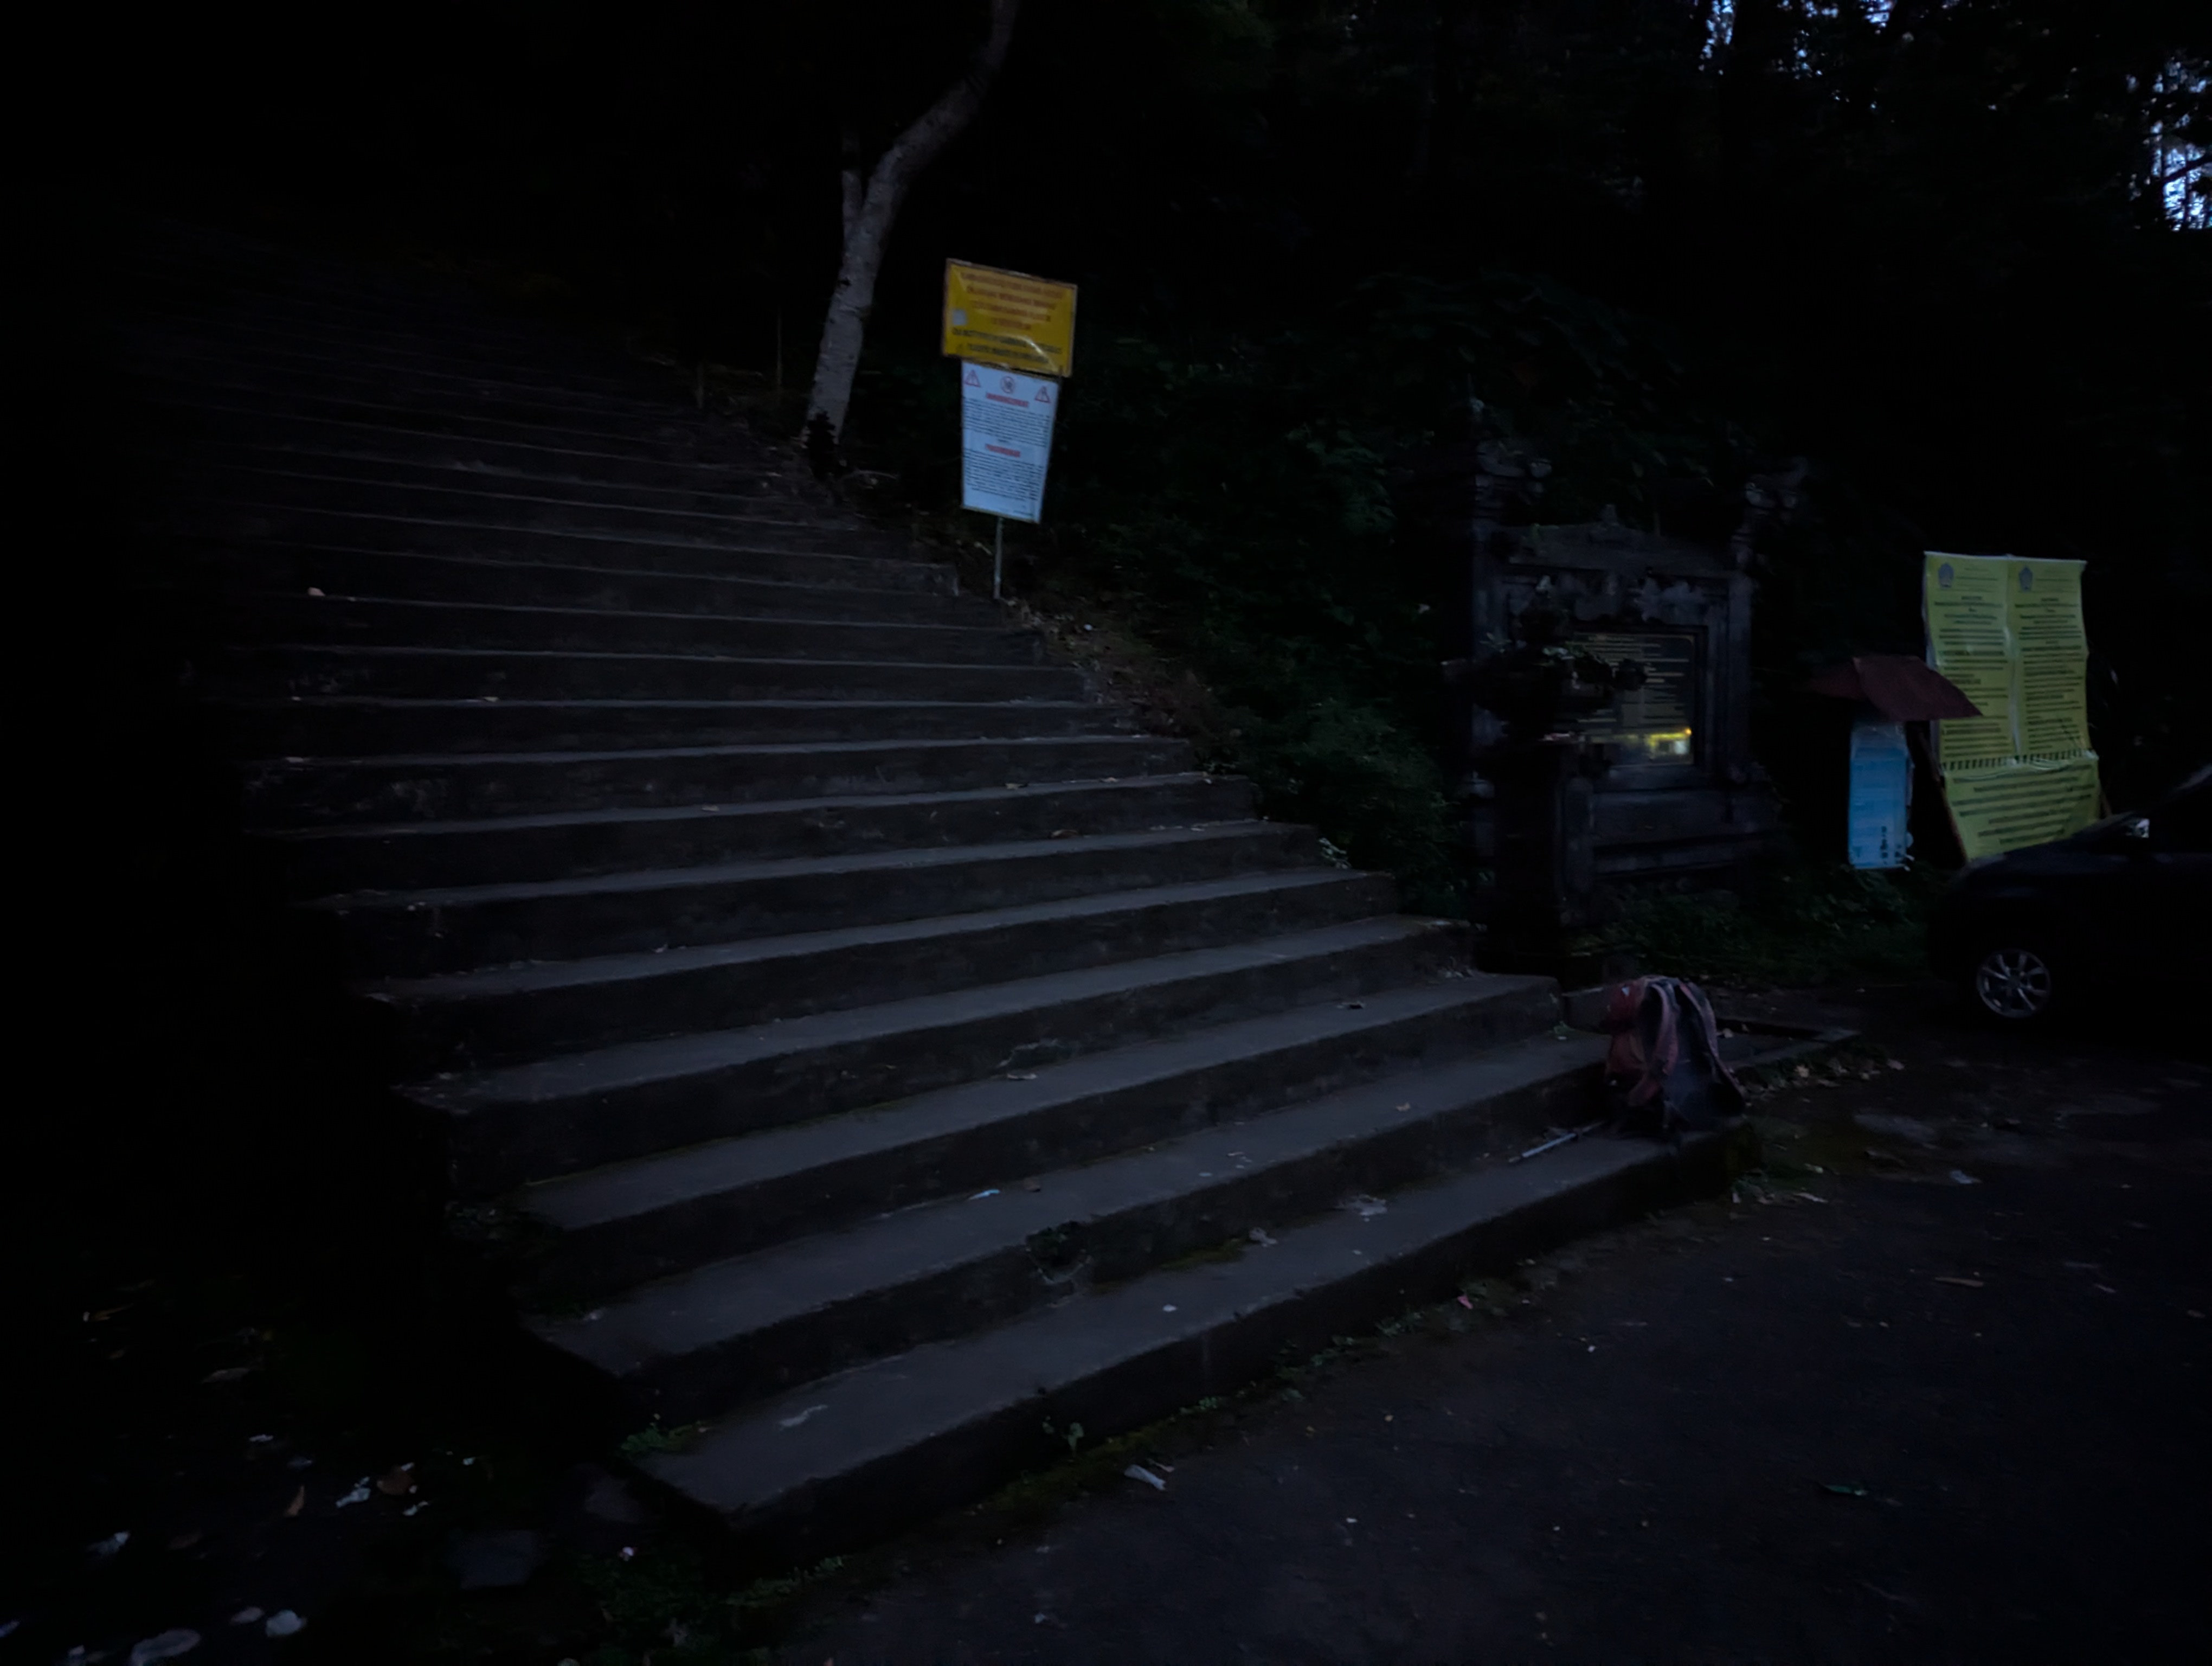
Steps leading to Pura Pasar Agung
The hike began at precisely 6am (just before sunrise) with a lengthy stone staircase up from the car park to the Pura Pasar Agung temple.
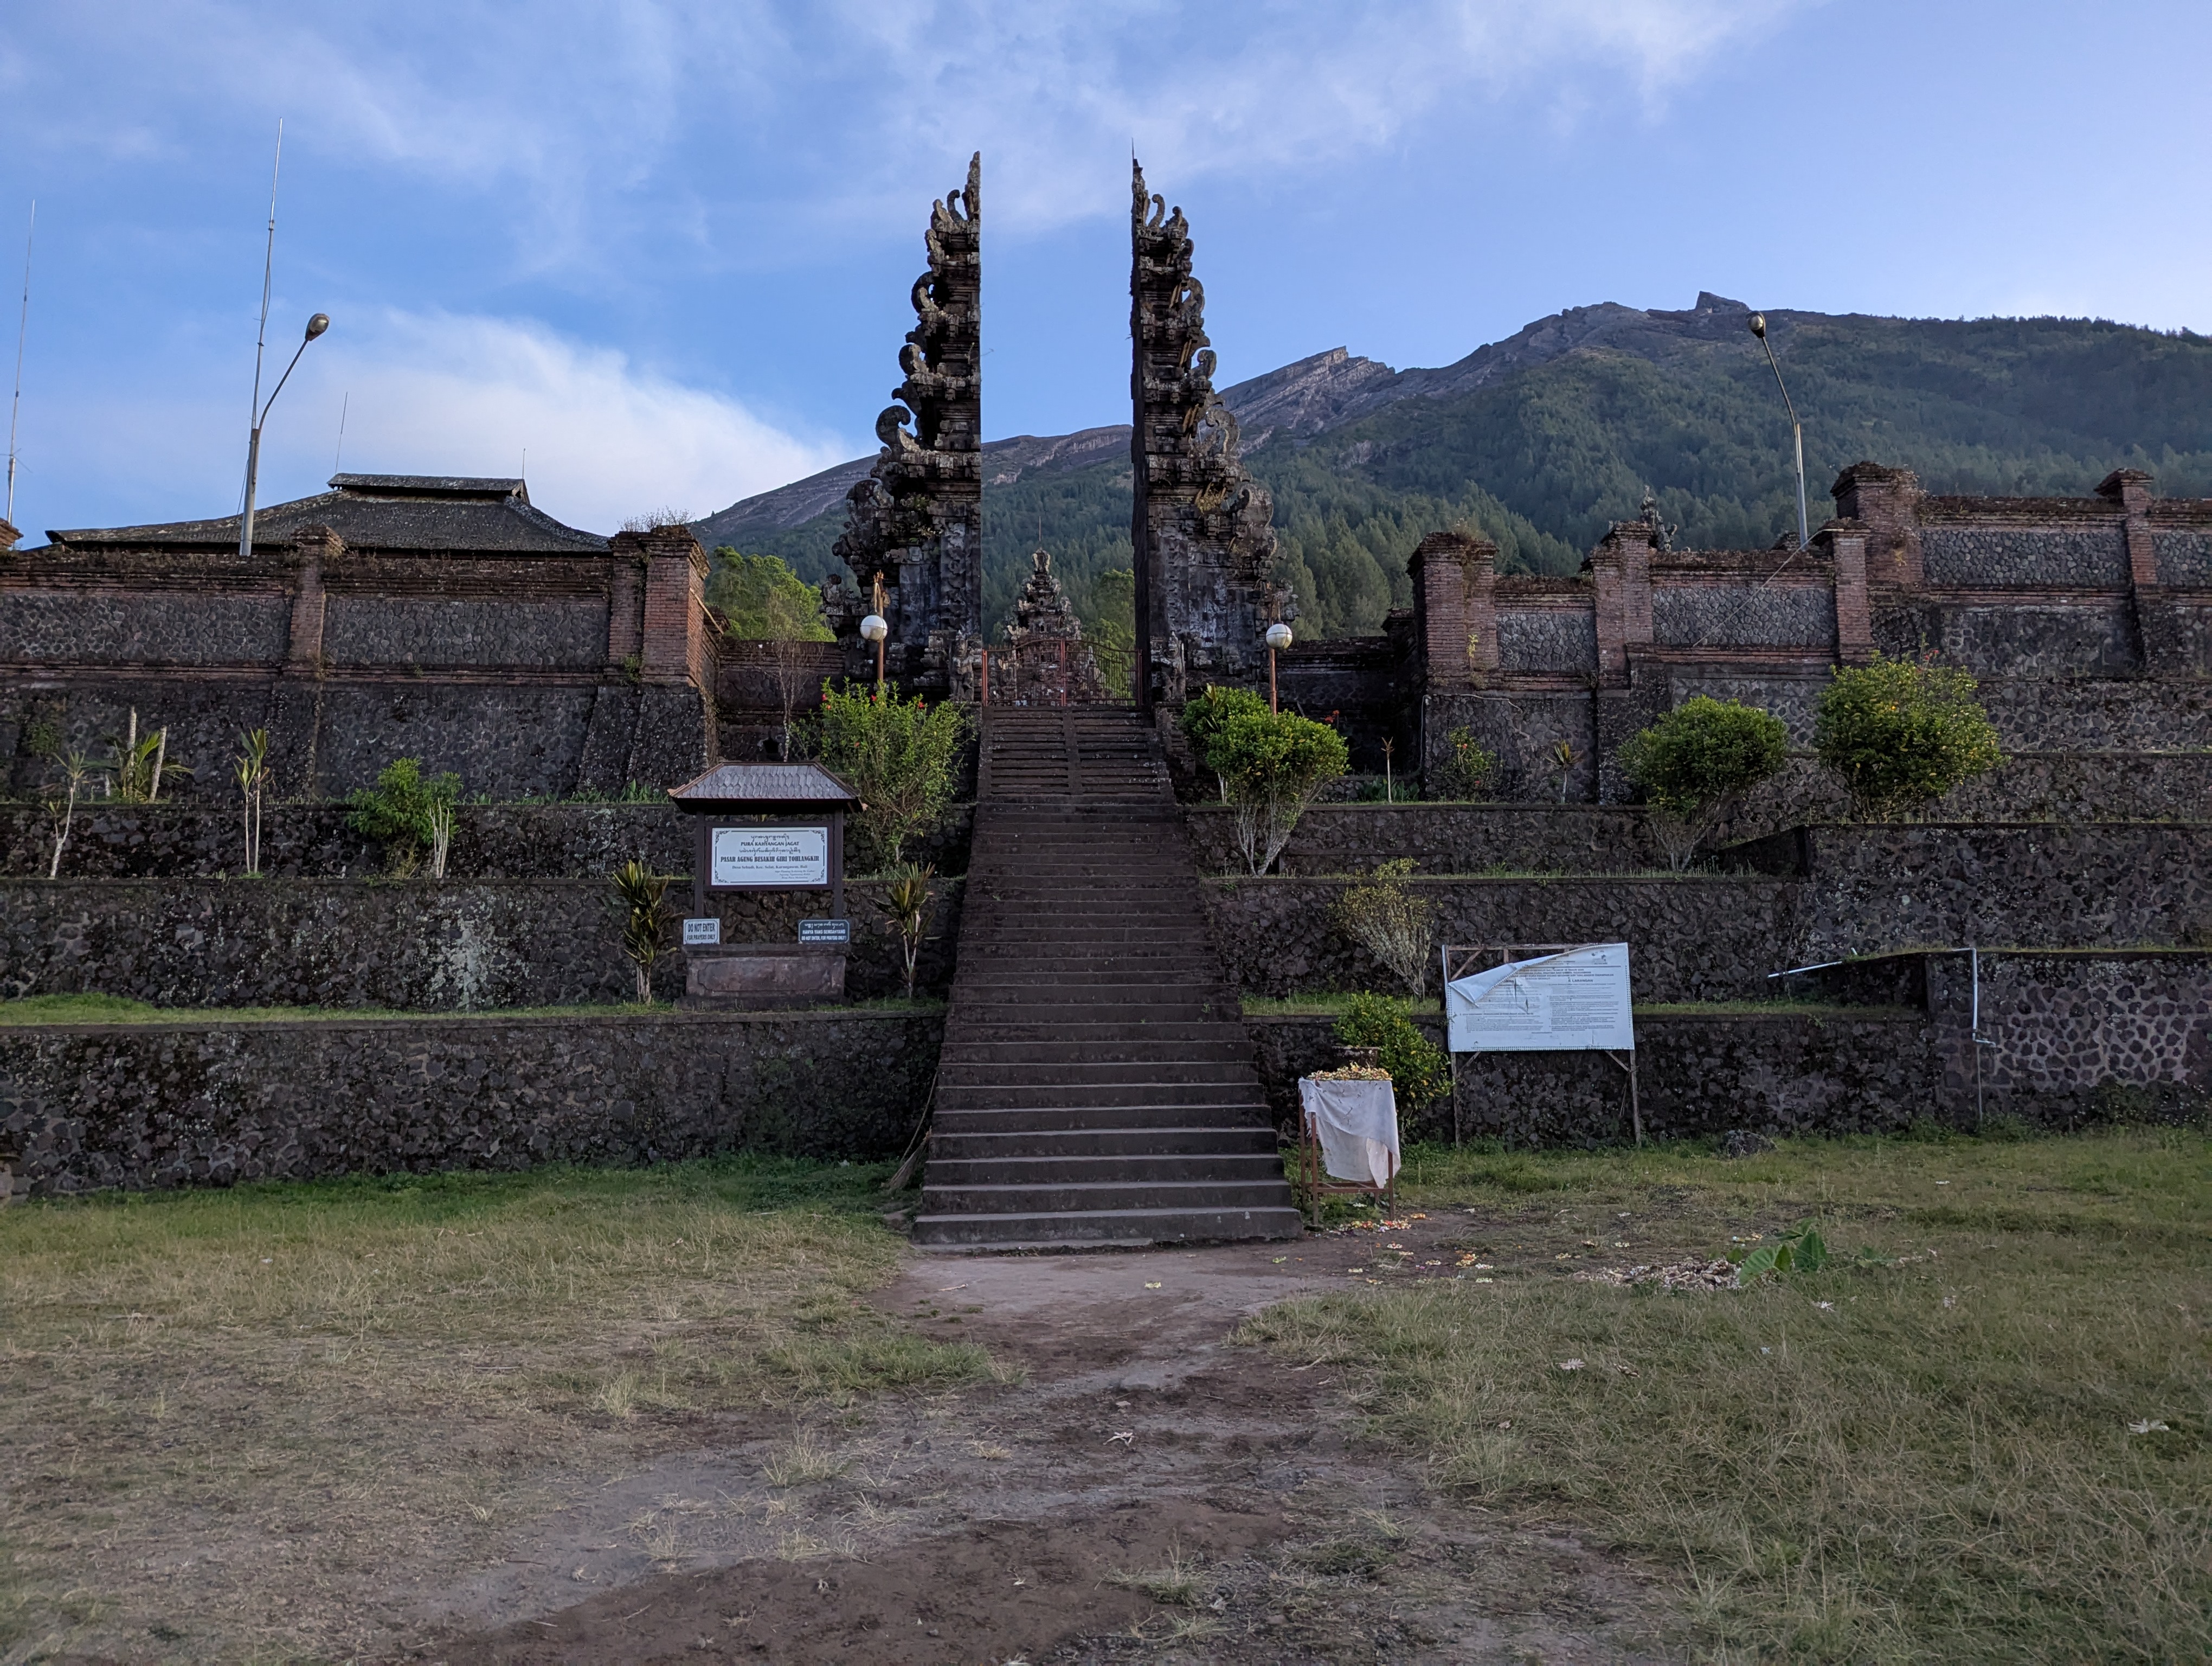
Pura Pasar Agung temple
After passing the temple the path entered the jungle and started going sharply uphill.
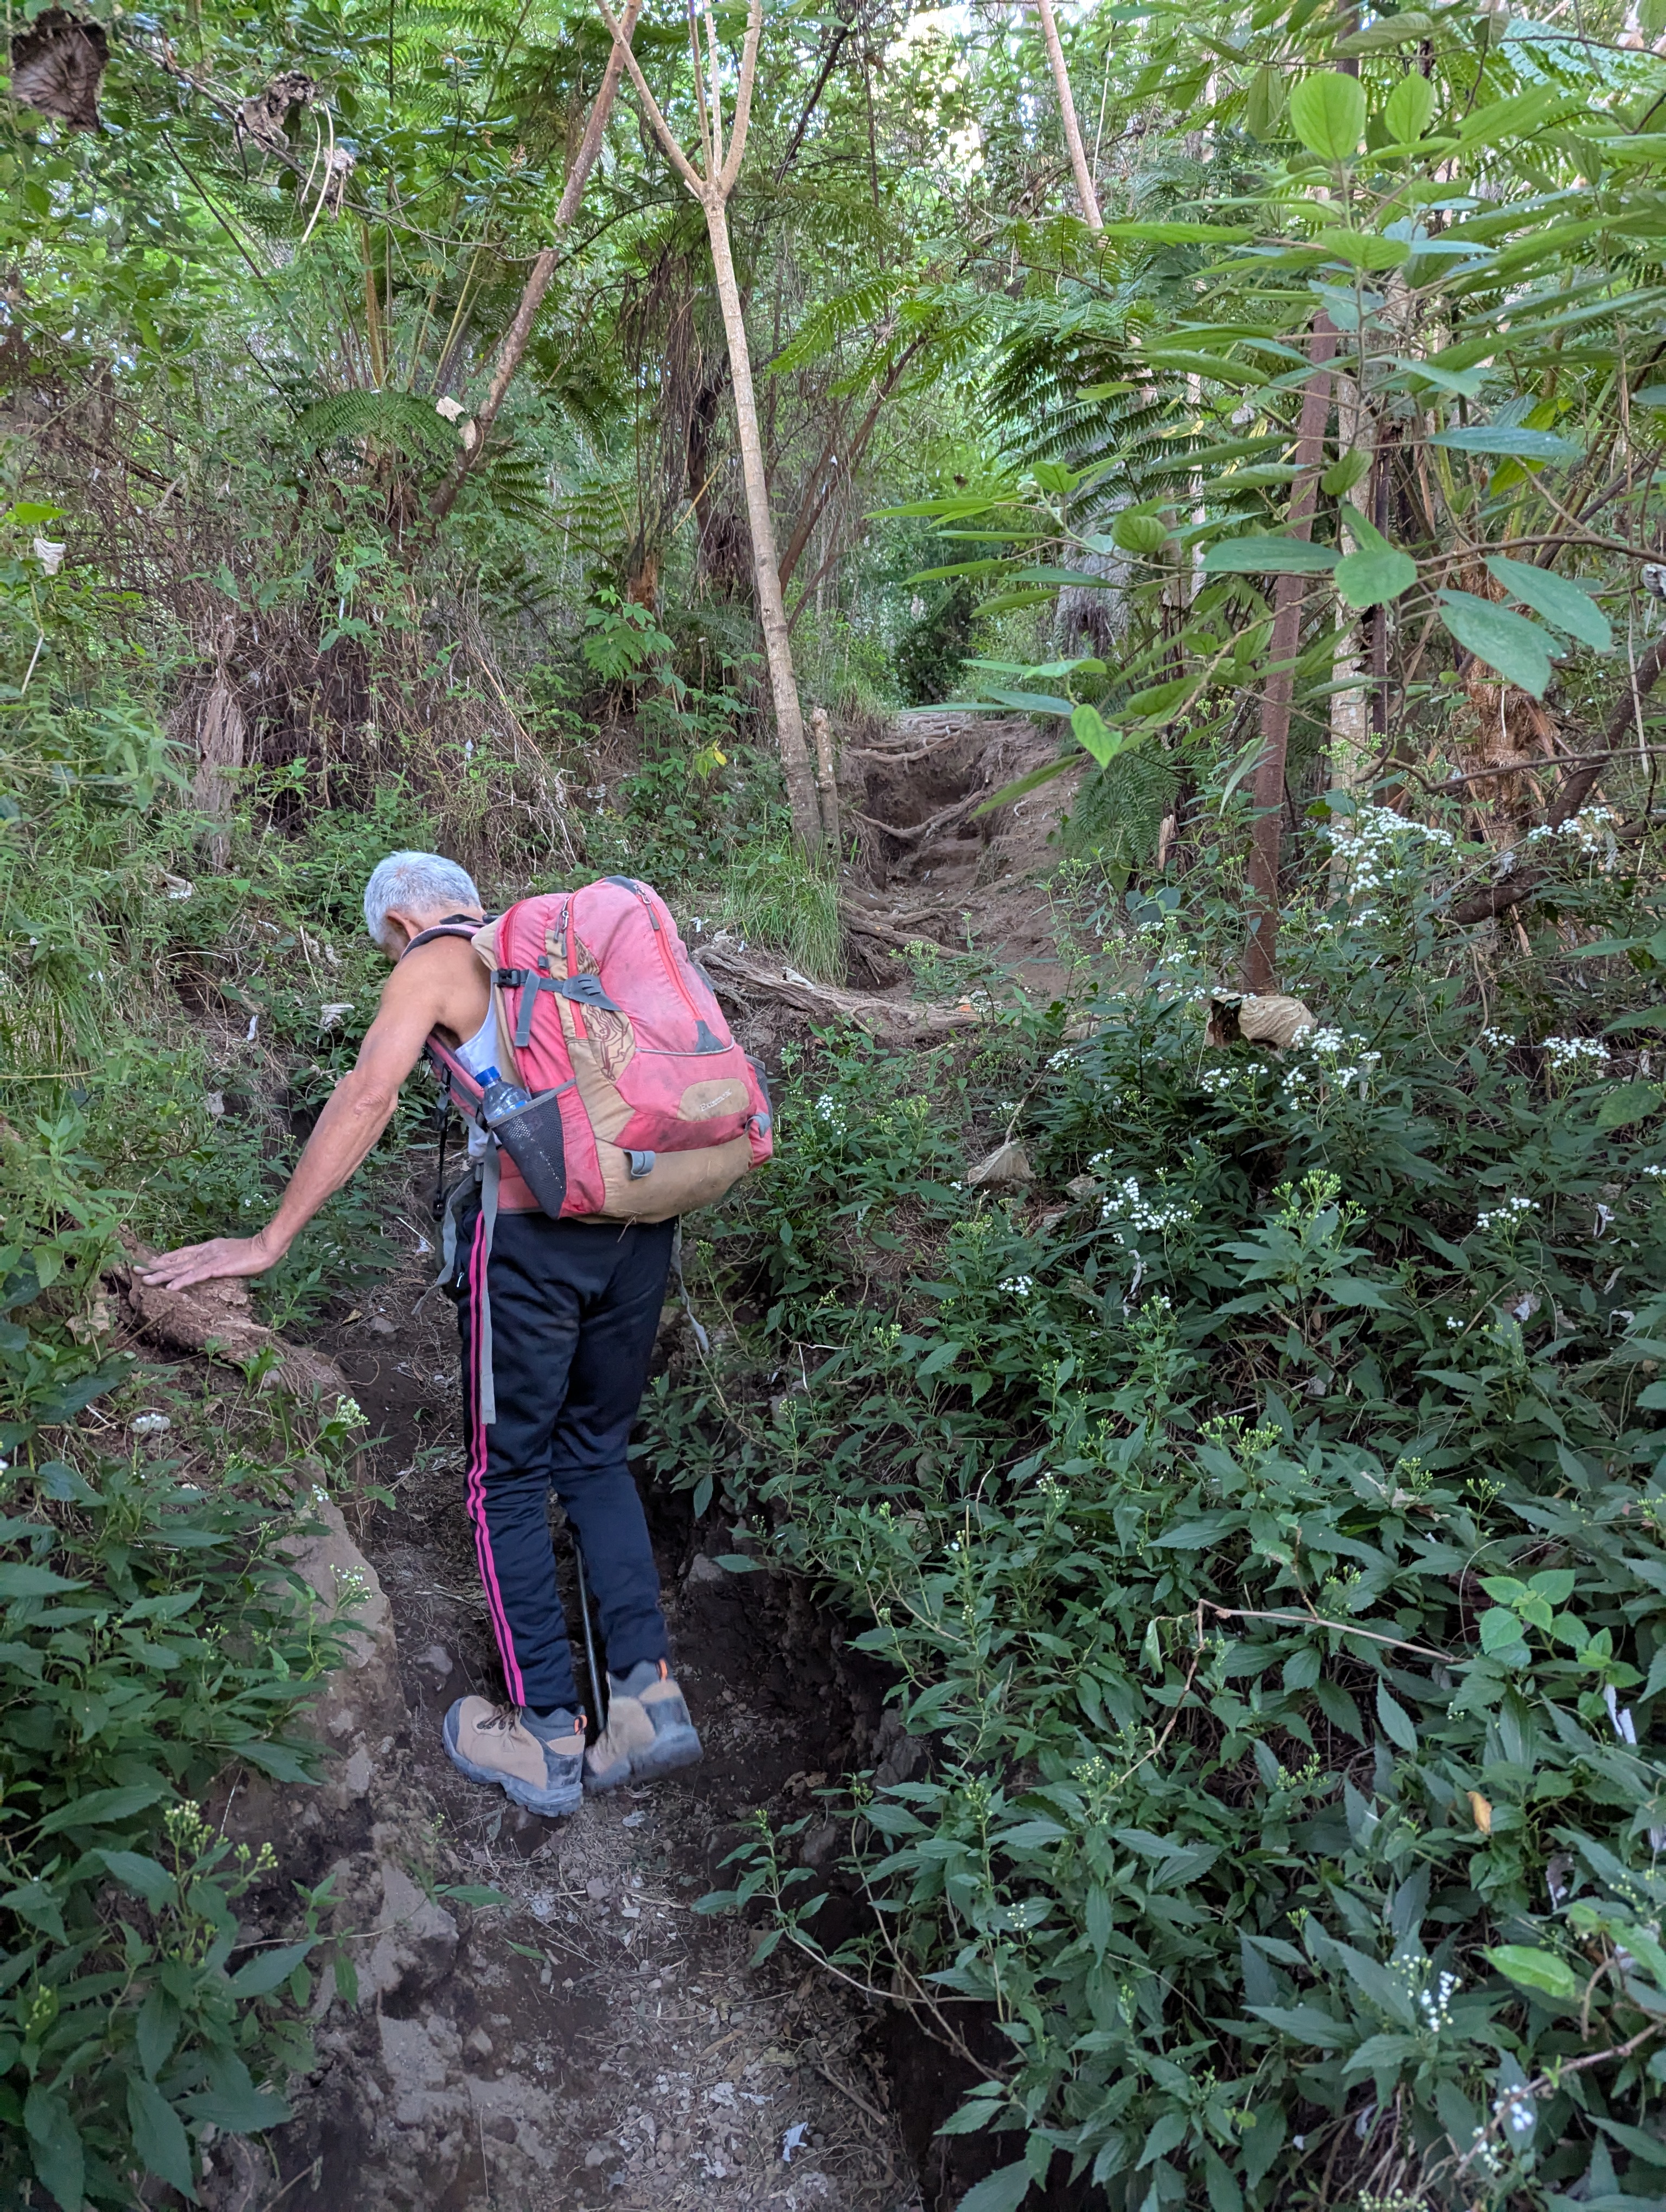
Hiking up through jungle
After an hour and a half or so the vegetation began to thin out somewhat and my guide said we had reached 2000m.

Views of the jungle surrounding the base of the volcano
A little while later we encountered the first of the sunrise trekkers on the way back down, soon followed by quite a few more. In total I think we passed around 20 people plus their guides on their way down to Pura Pasar Agung as we were going up.
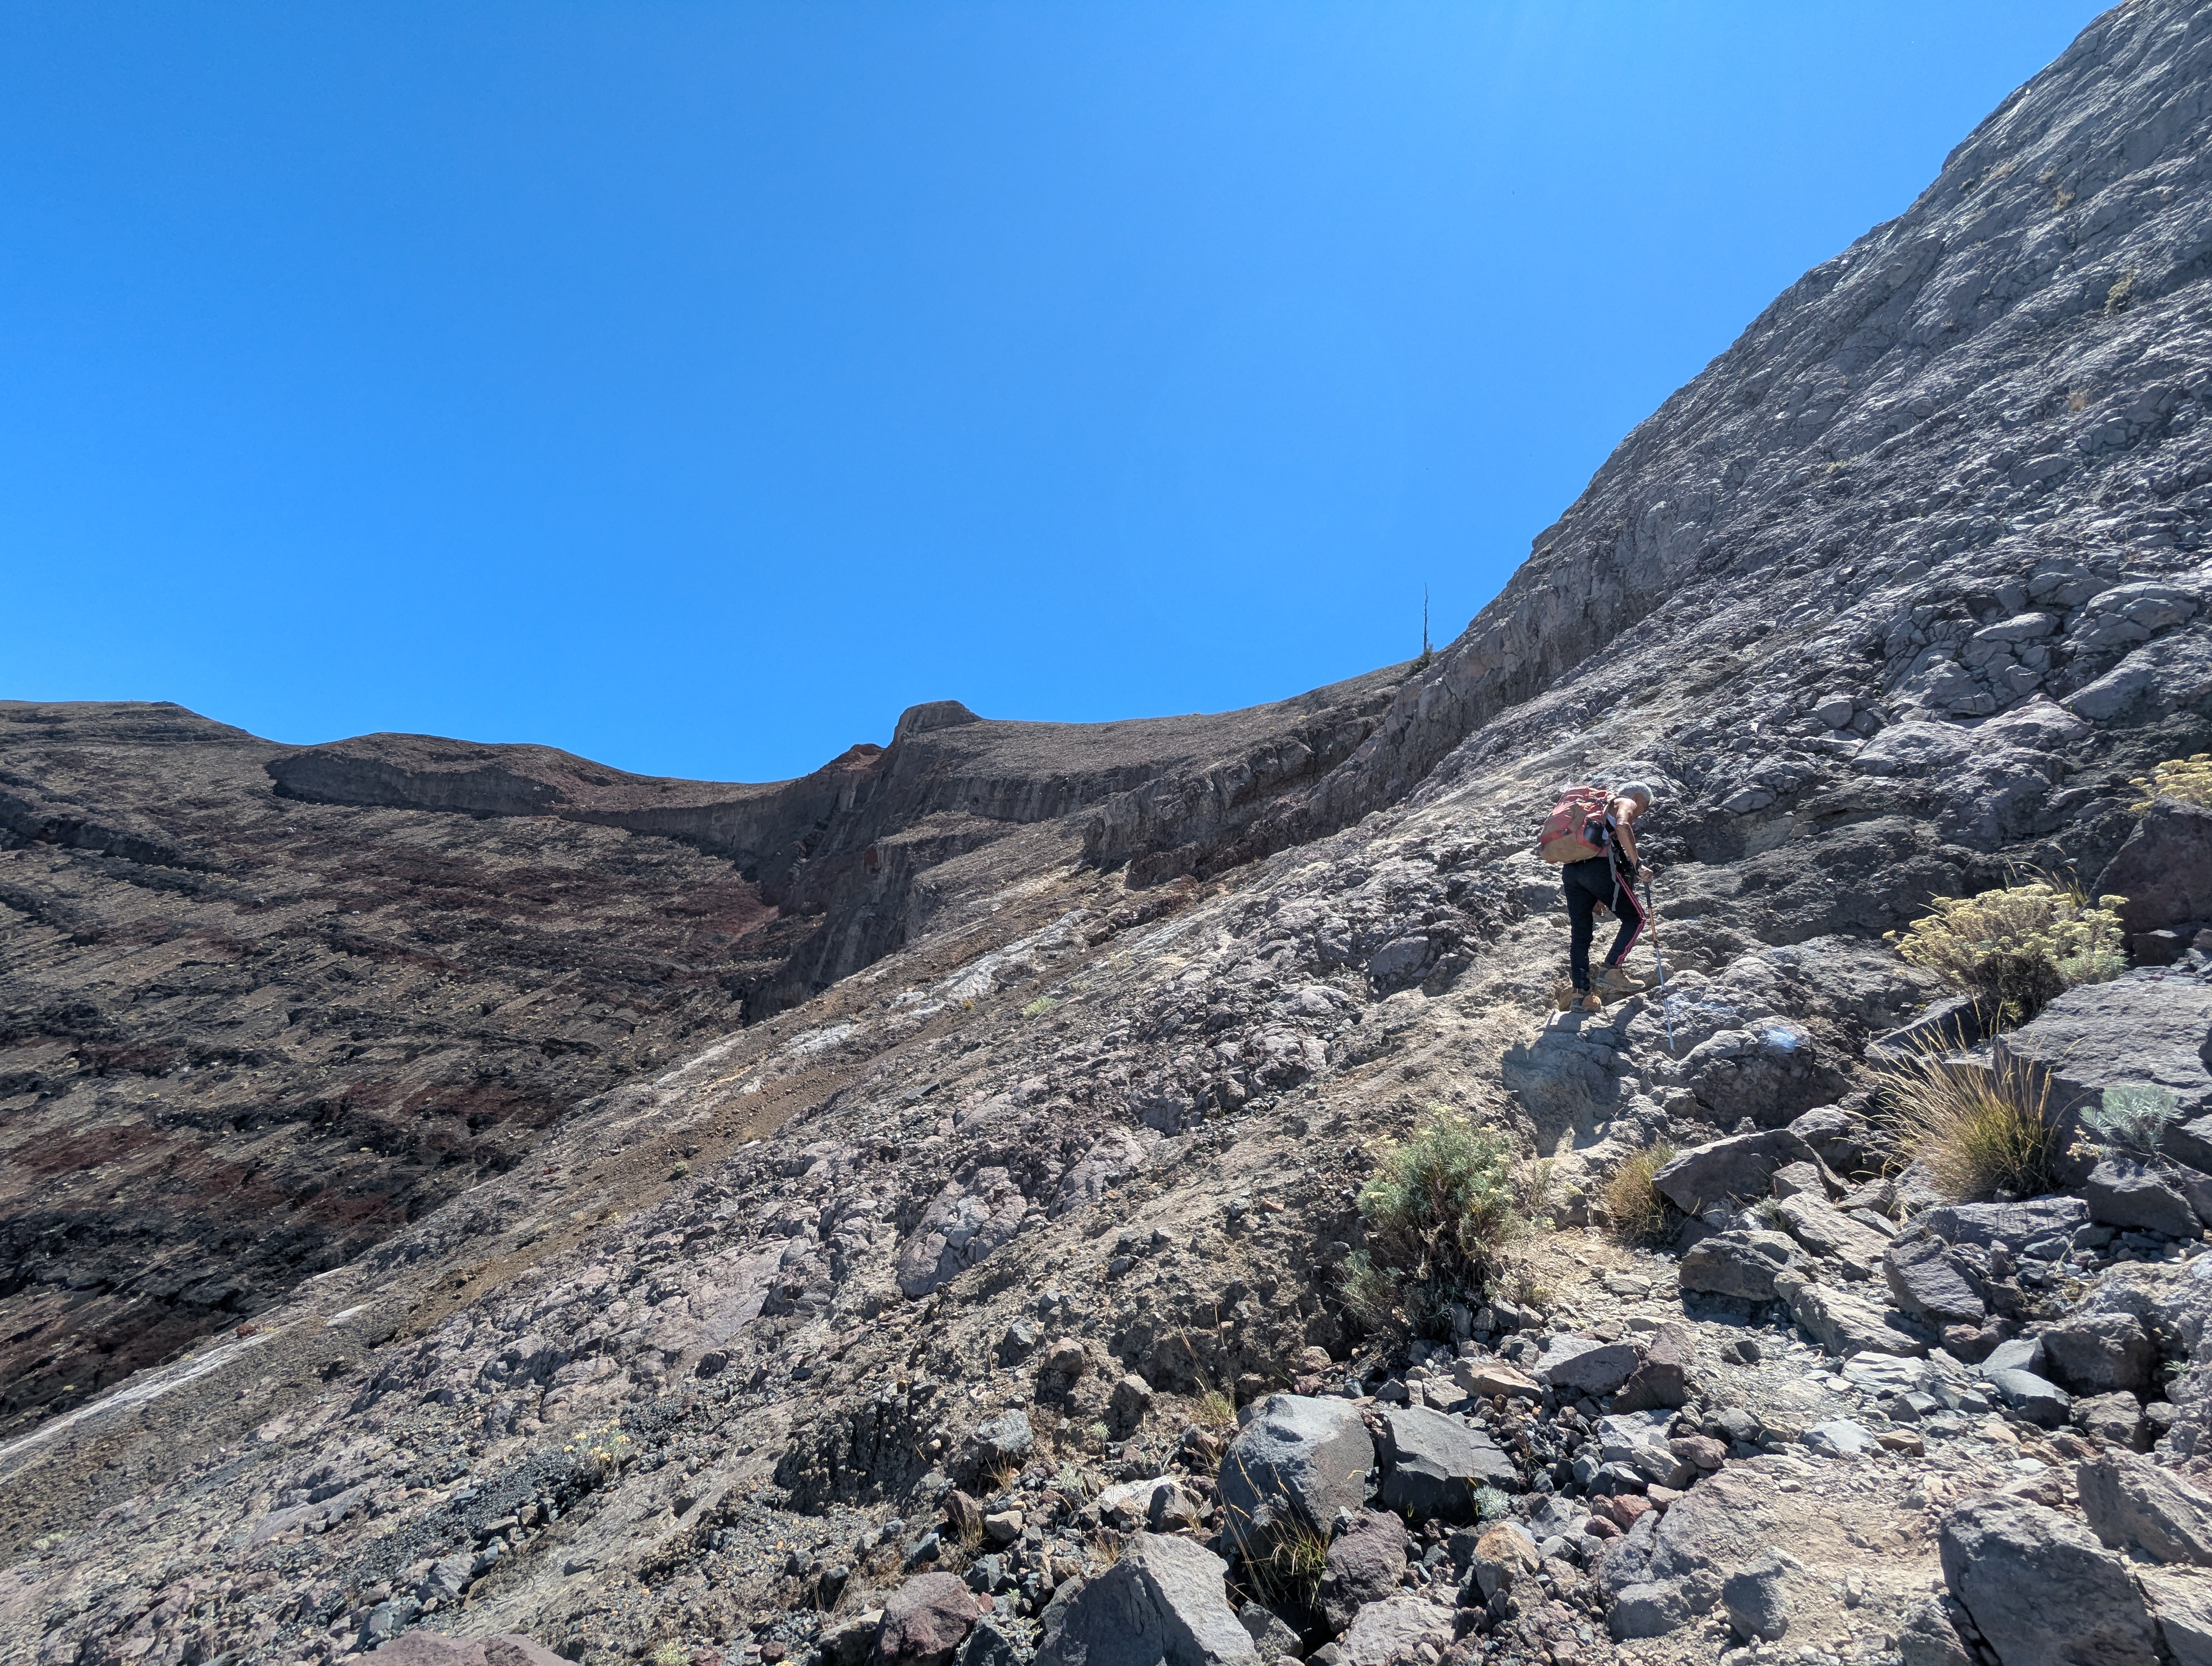
Steep rocky ascent
At around 2450m, the path to the summit split from the more typical path to the lower crater rim.
Looking back down
If I had over-estimated my ability, this would have been an opportunity to change the plan and instead opt for the shortest route (to the crater rim and then back to Pura Pasar Agung), but thankfully I was still feeling fine so we continued with the original plan.
Large chunks of cooled lava
By this point there was very little vegetation, with the path and its surroundings being mostly rocks (old lava flows) and dirt.
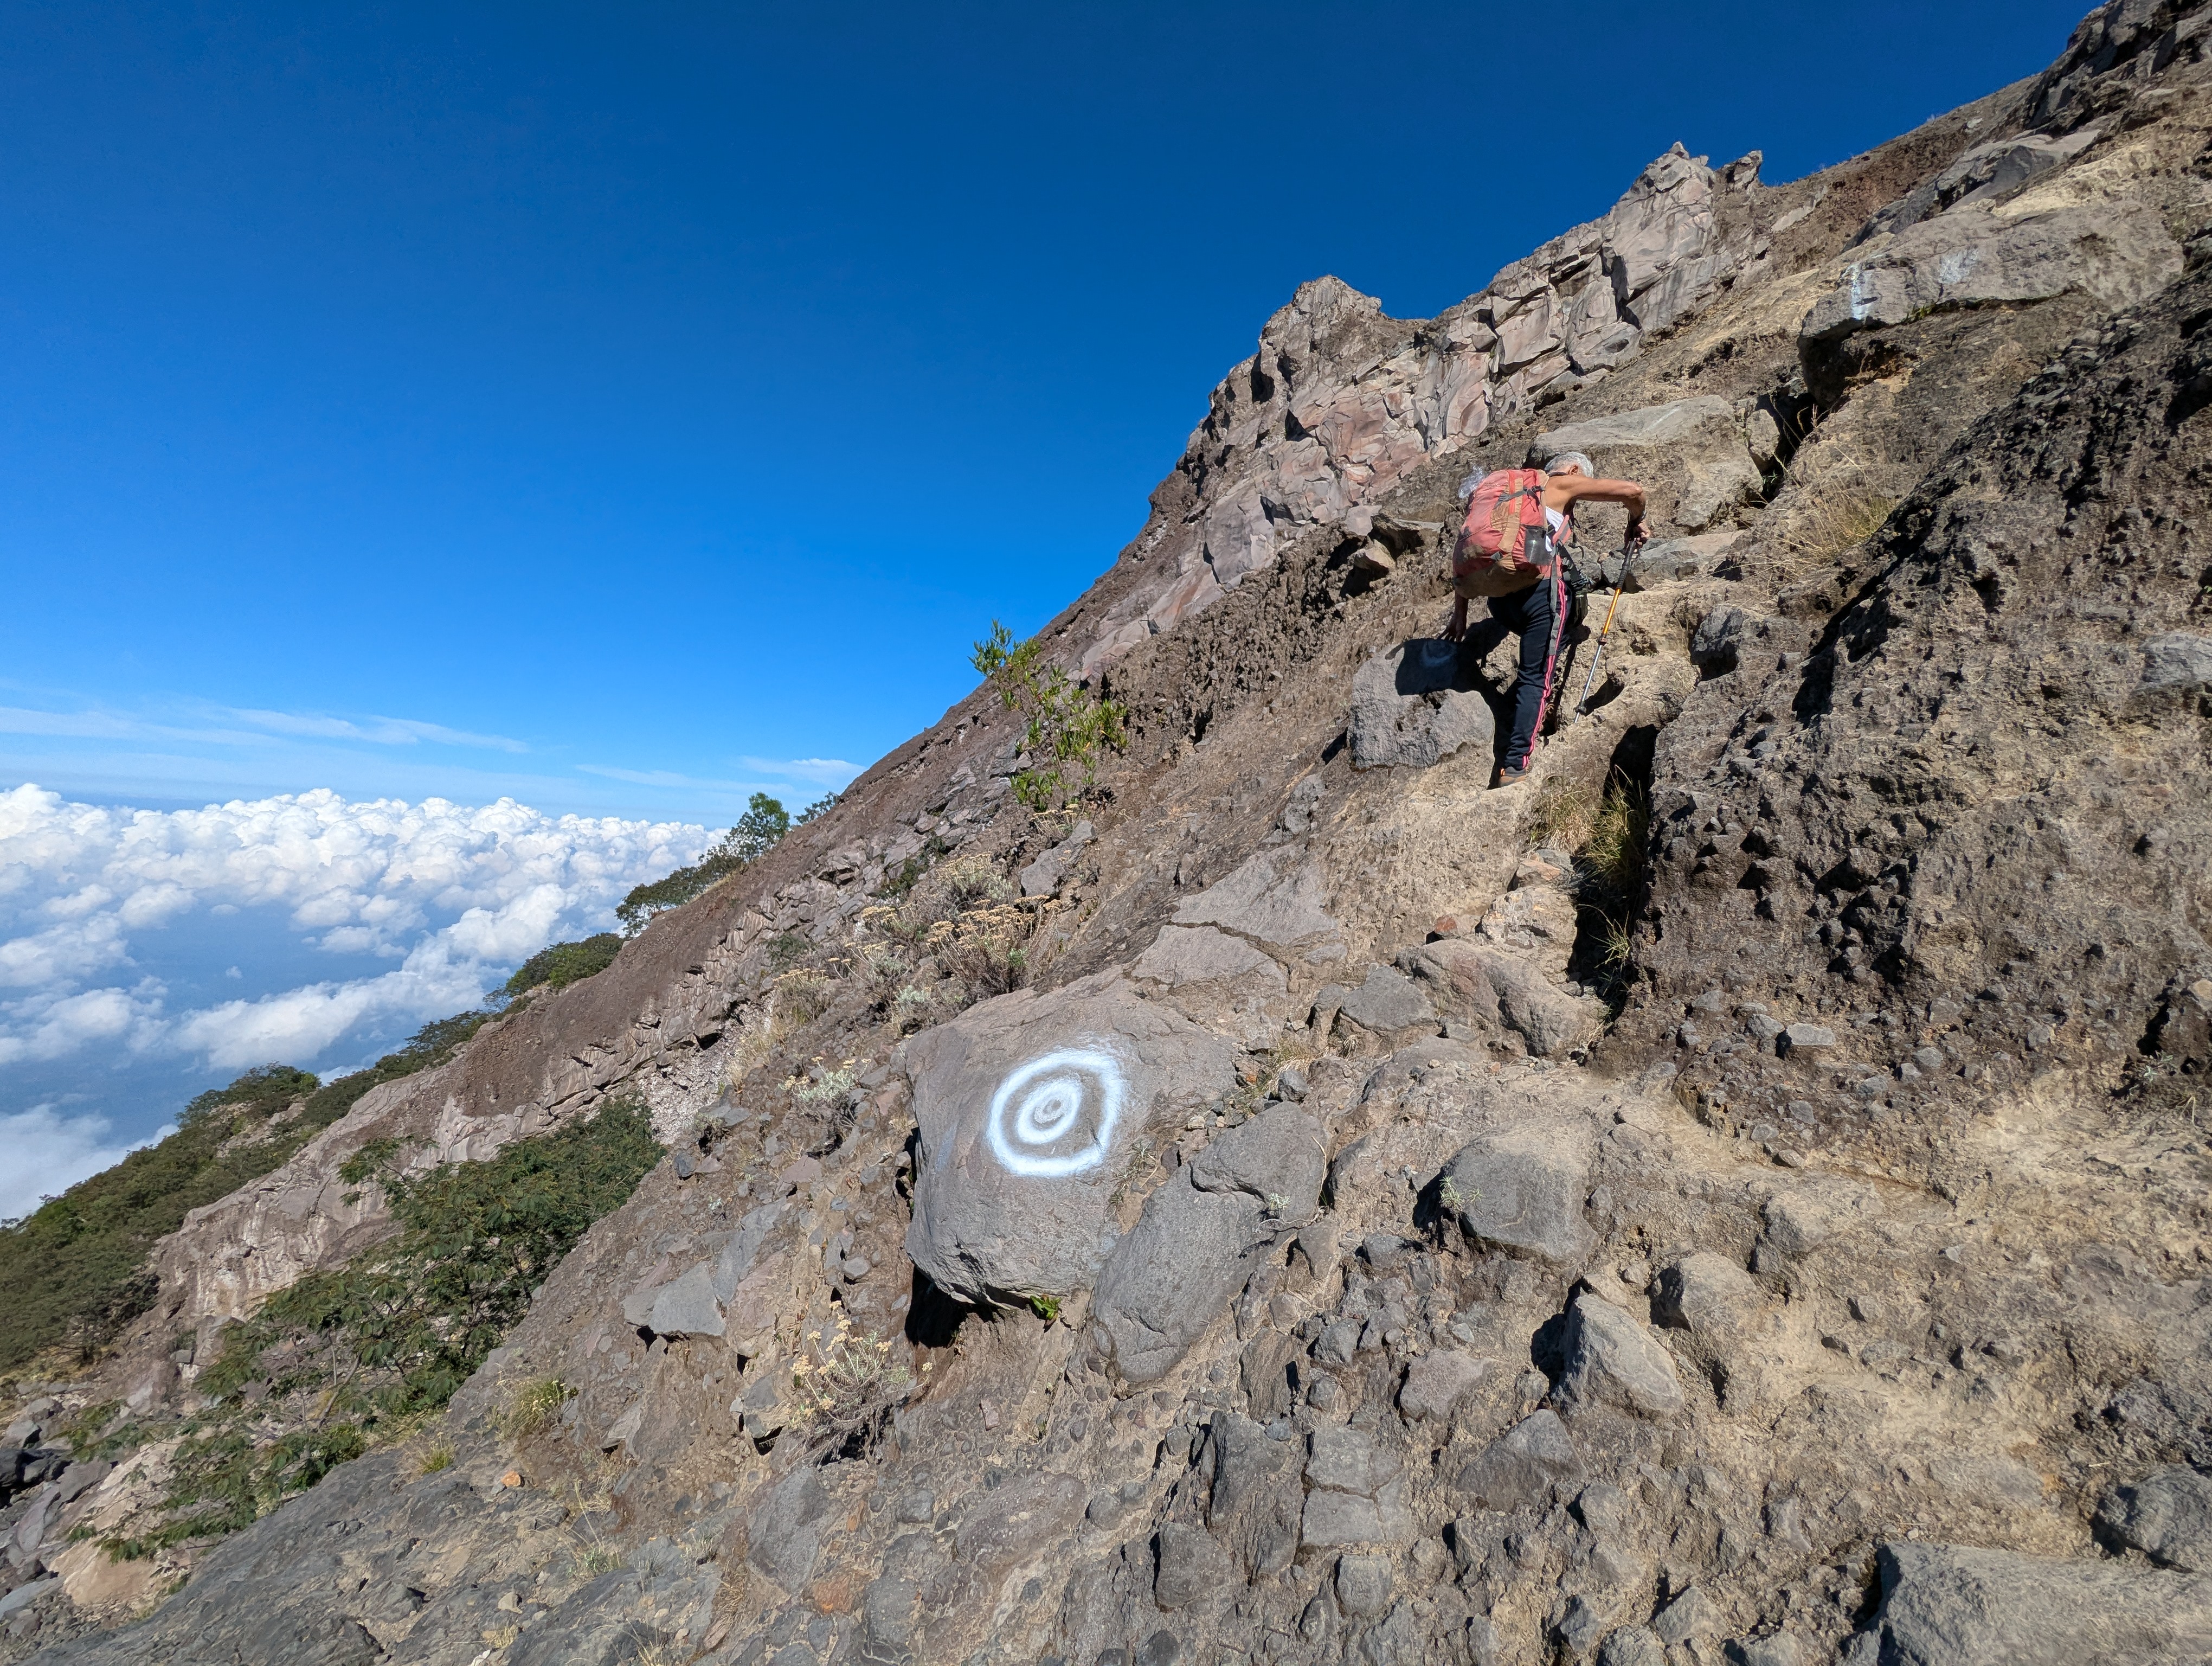
Fun scrambling sections
After traversing to the West for a little while, the final section of the path to the summit from Besakih came into view - a ridge approaching the summit from the West.

Interesting red coloured rock
We could see a number of other daytime hikers walking along the top of that ridge, some on their way up and some heading back down.
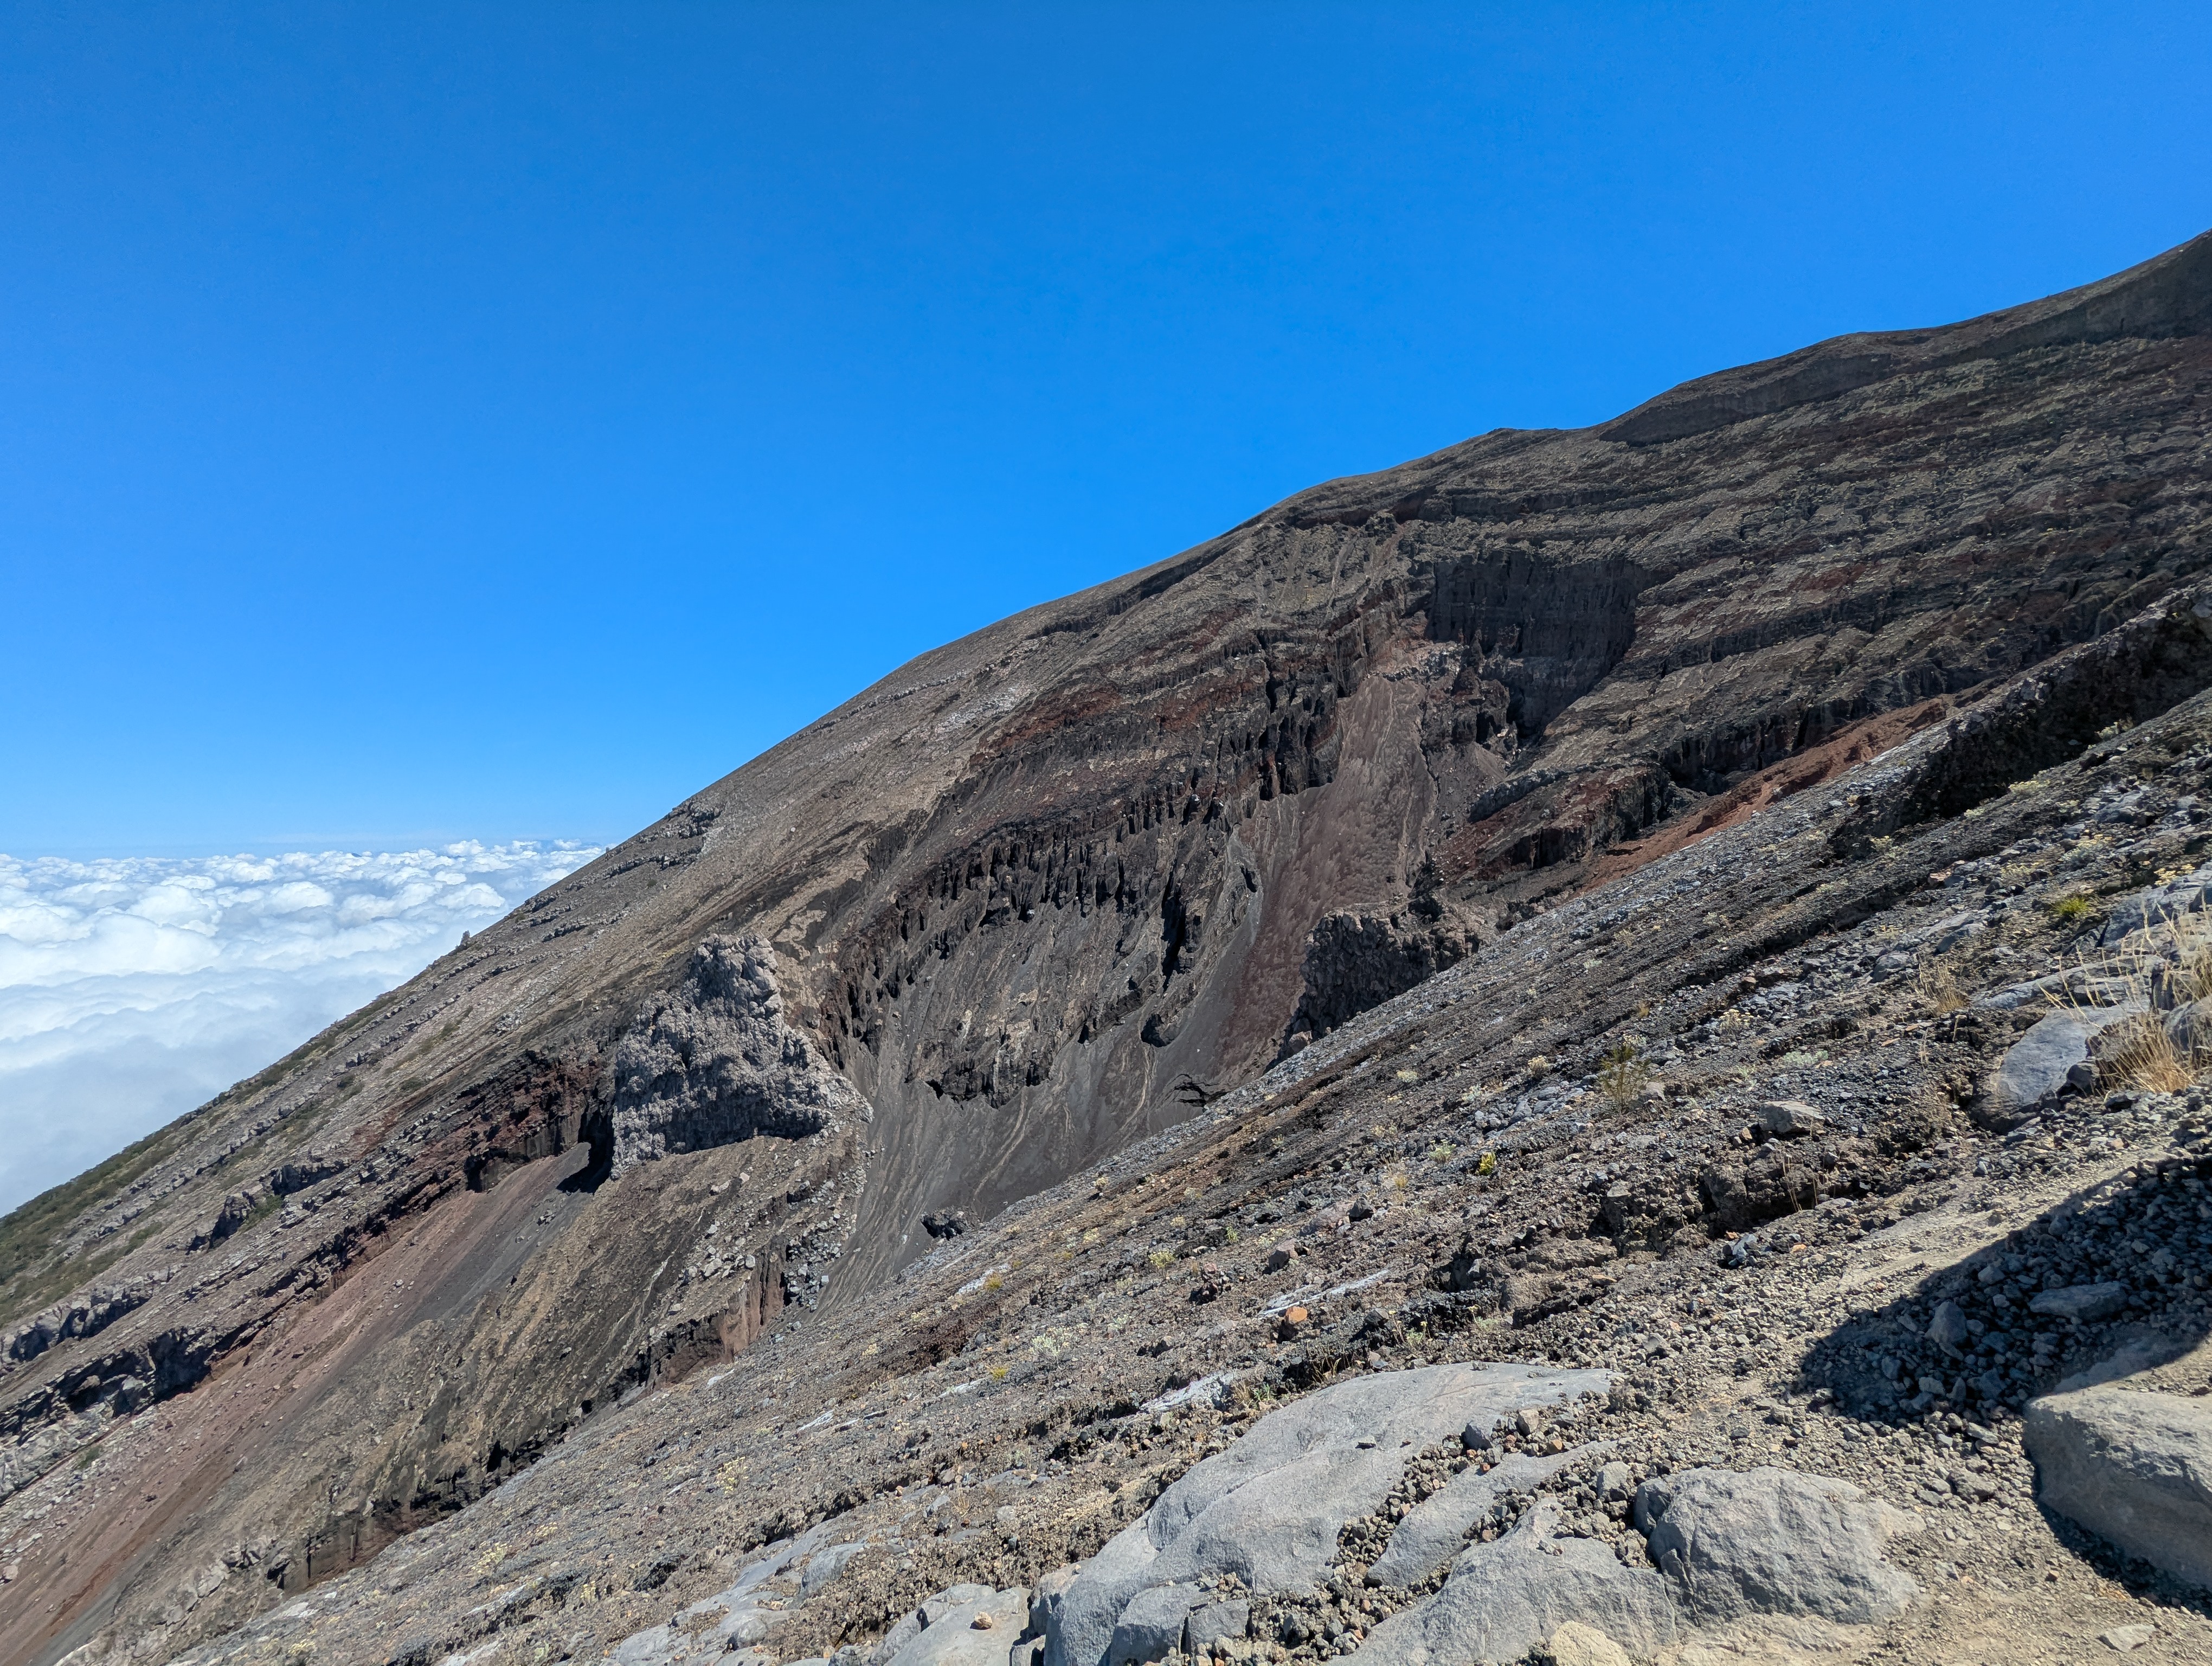
Western side of the volcano
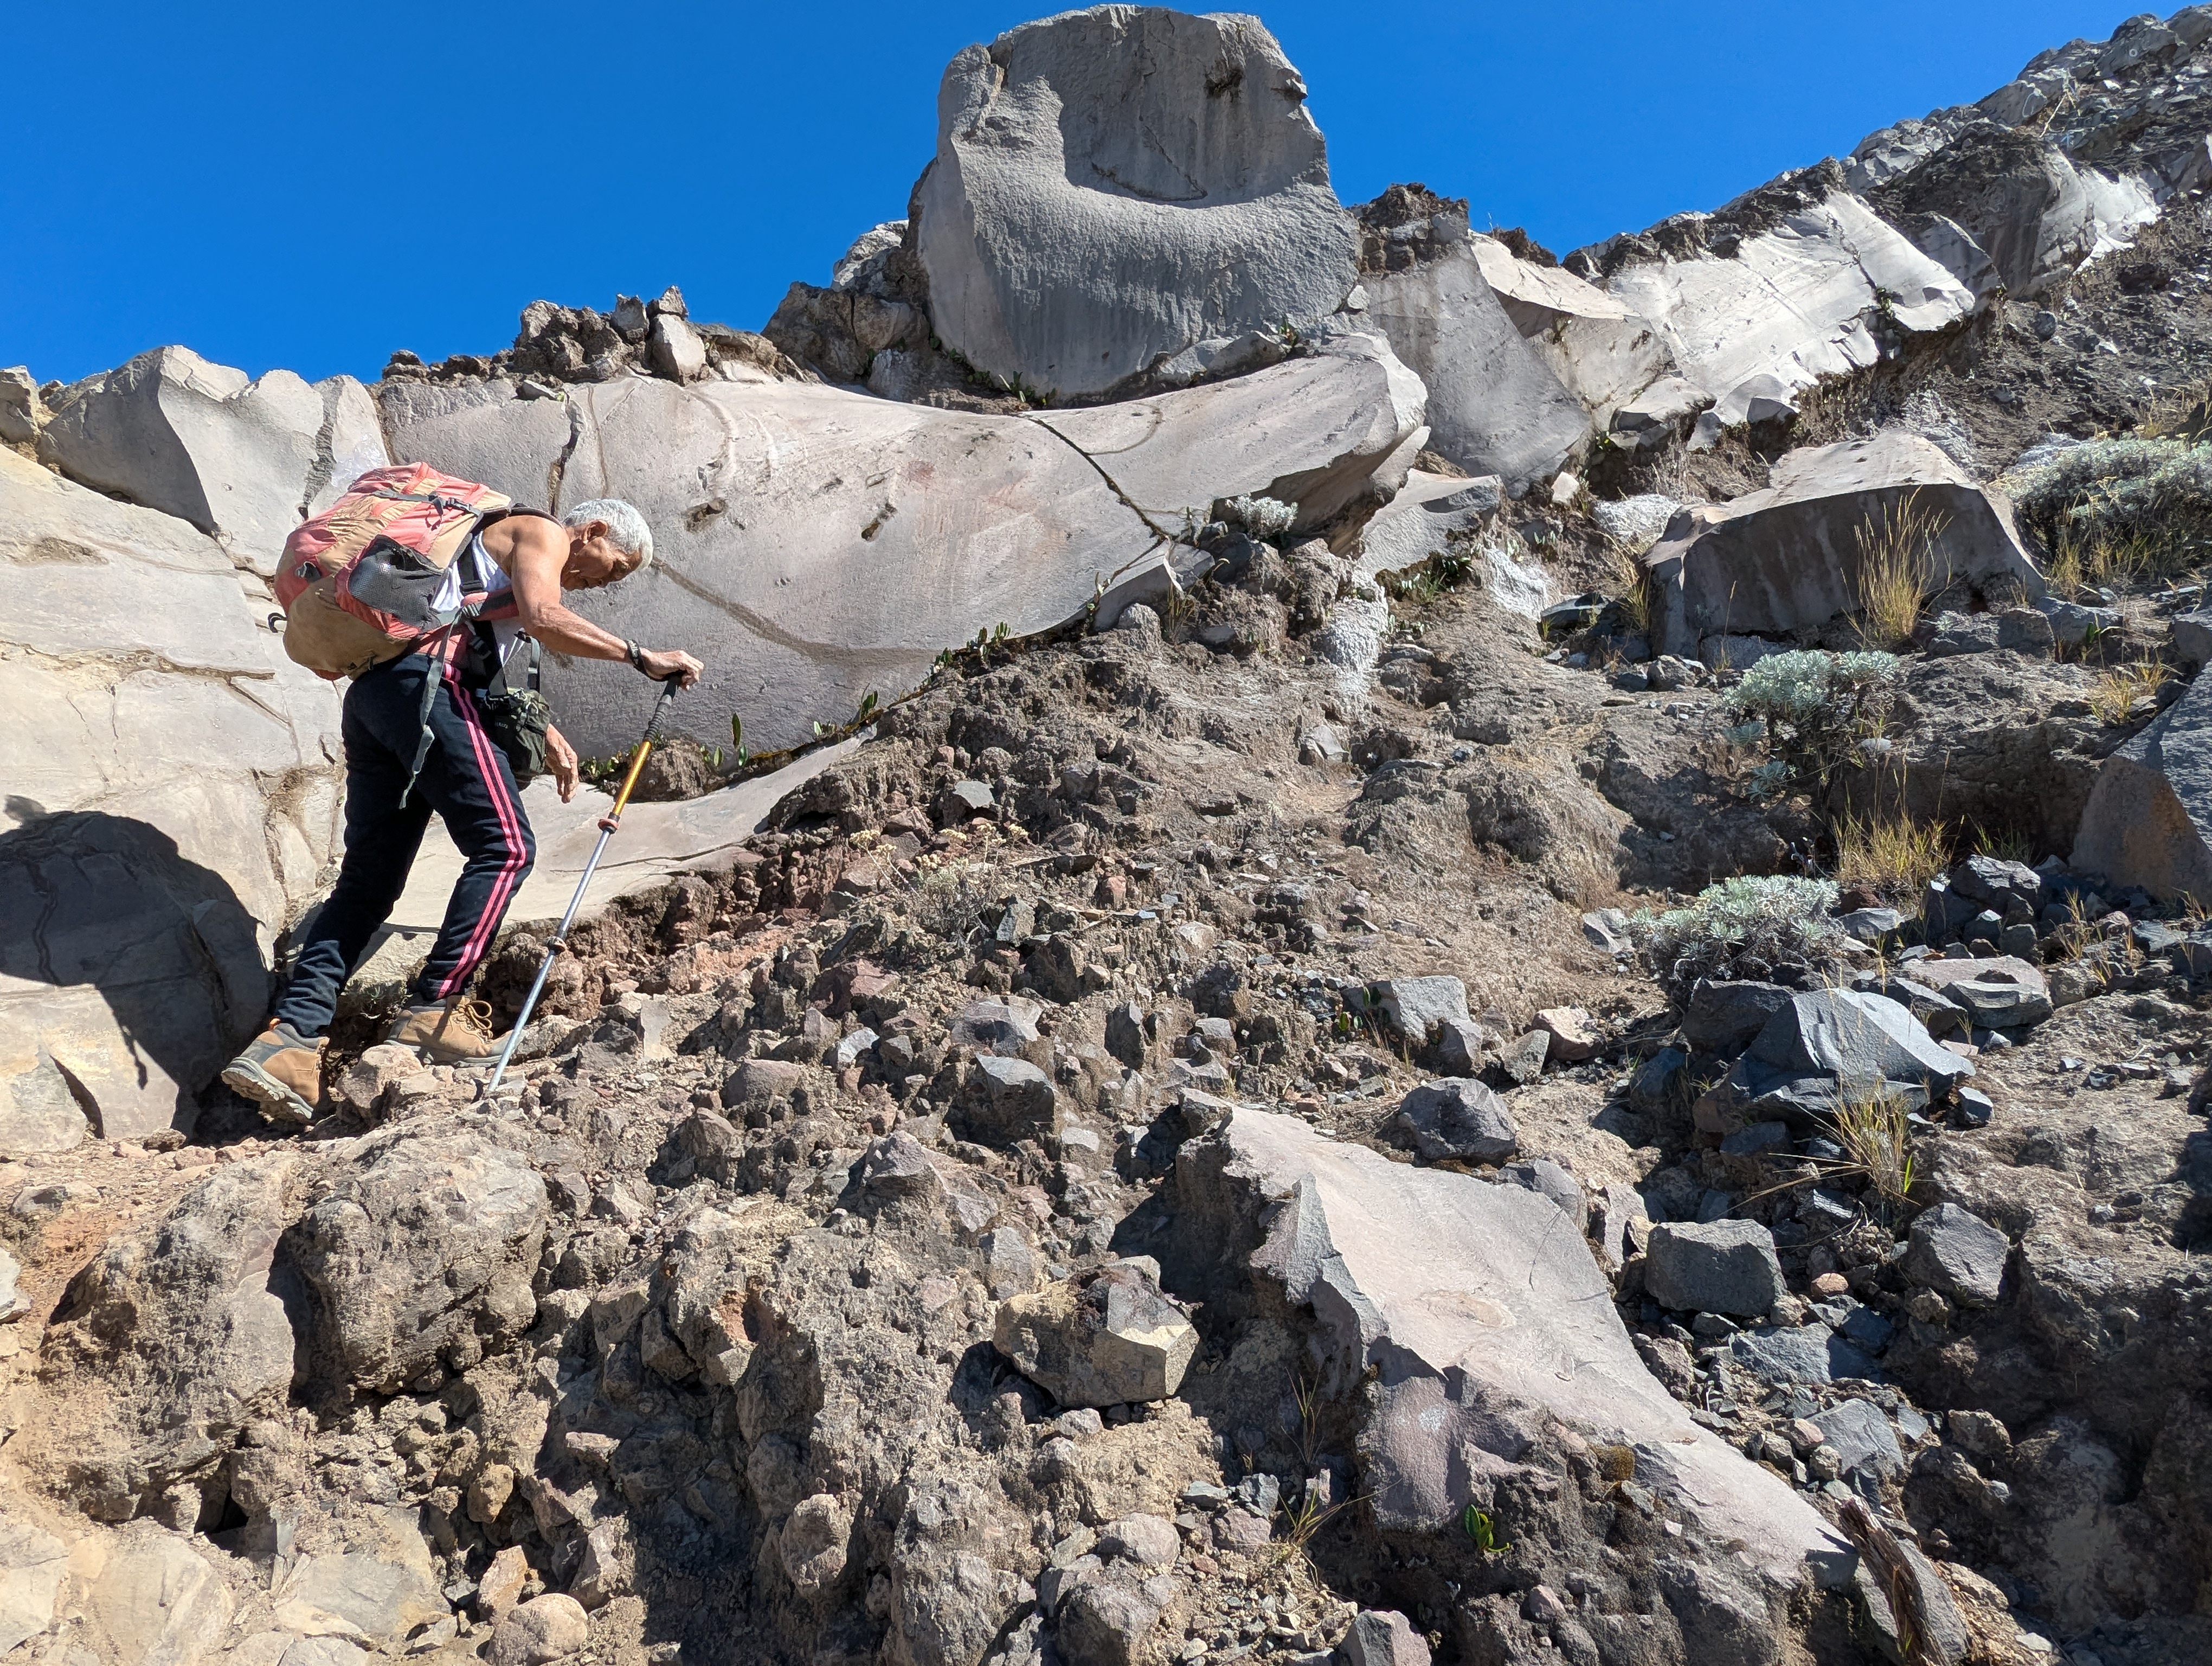
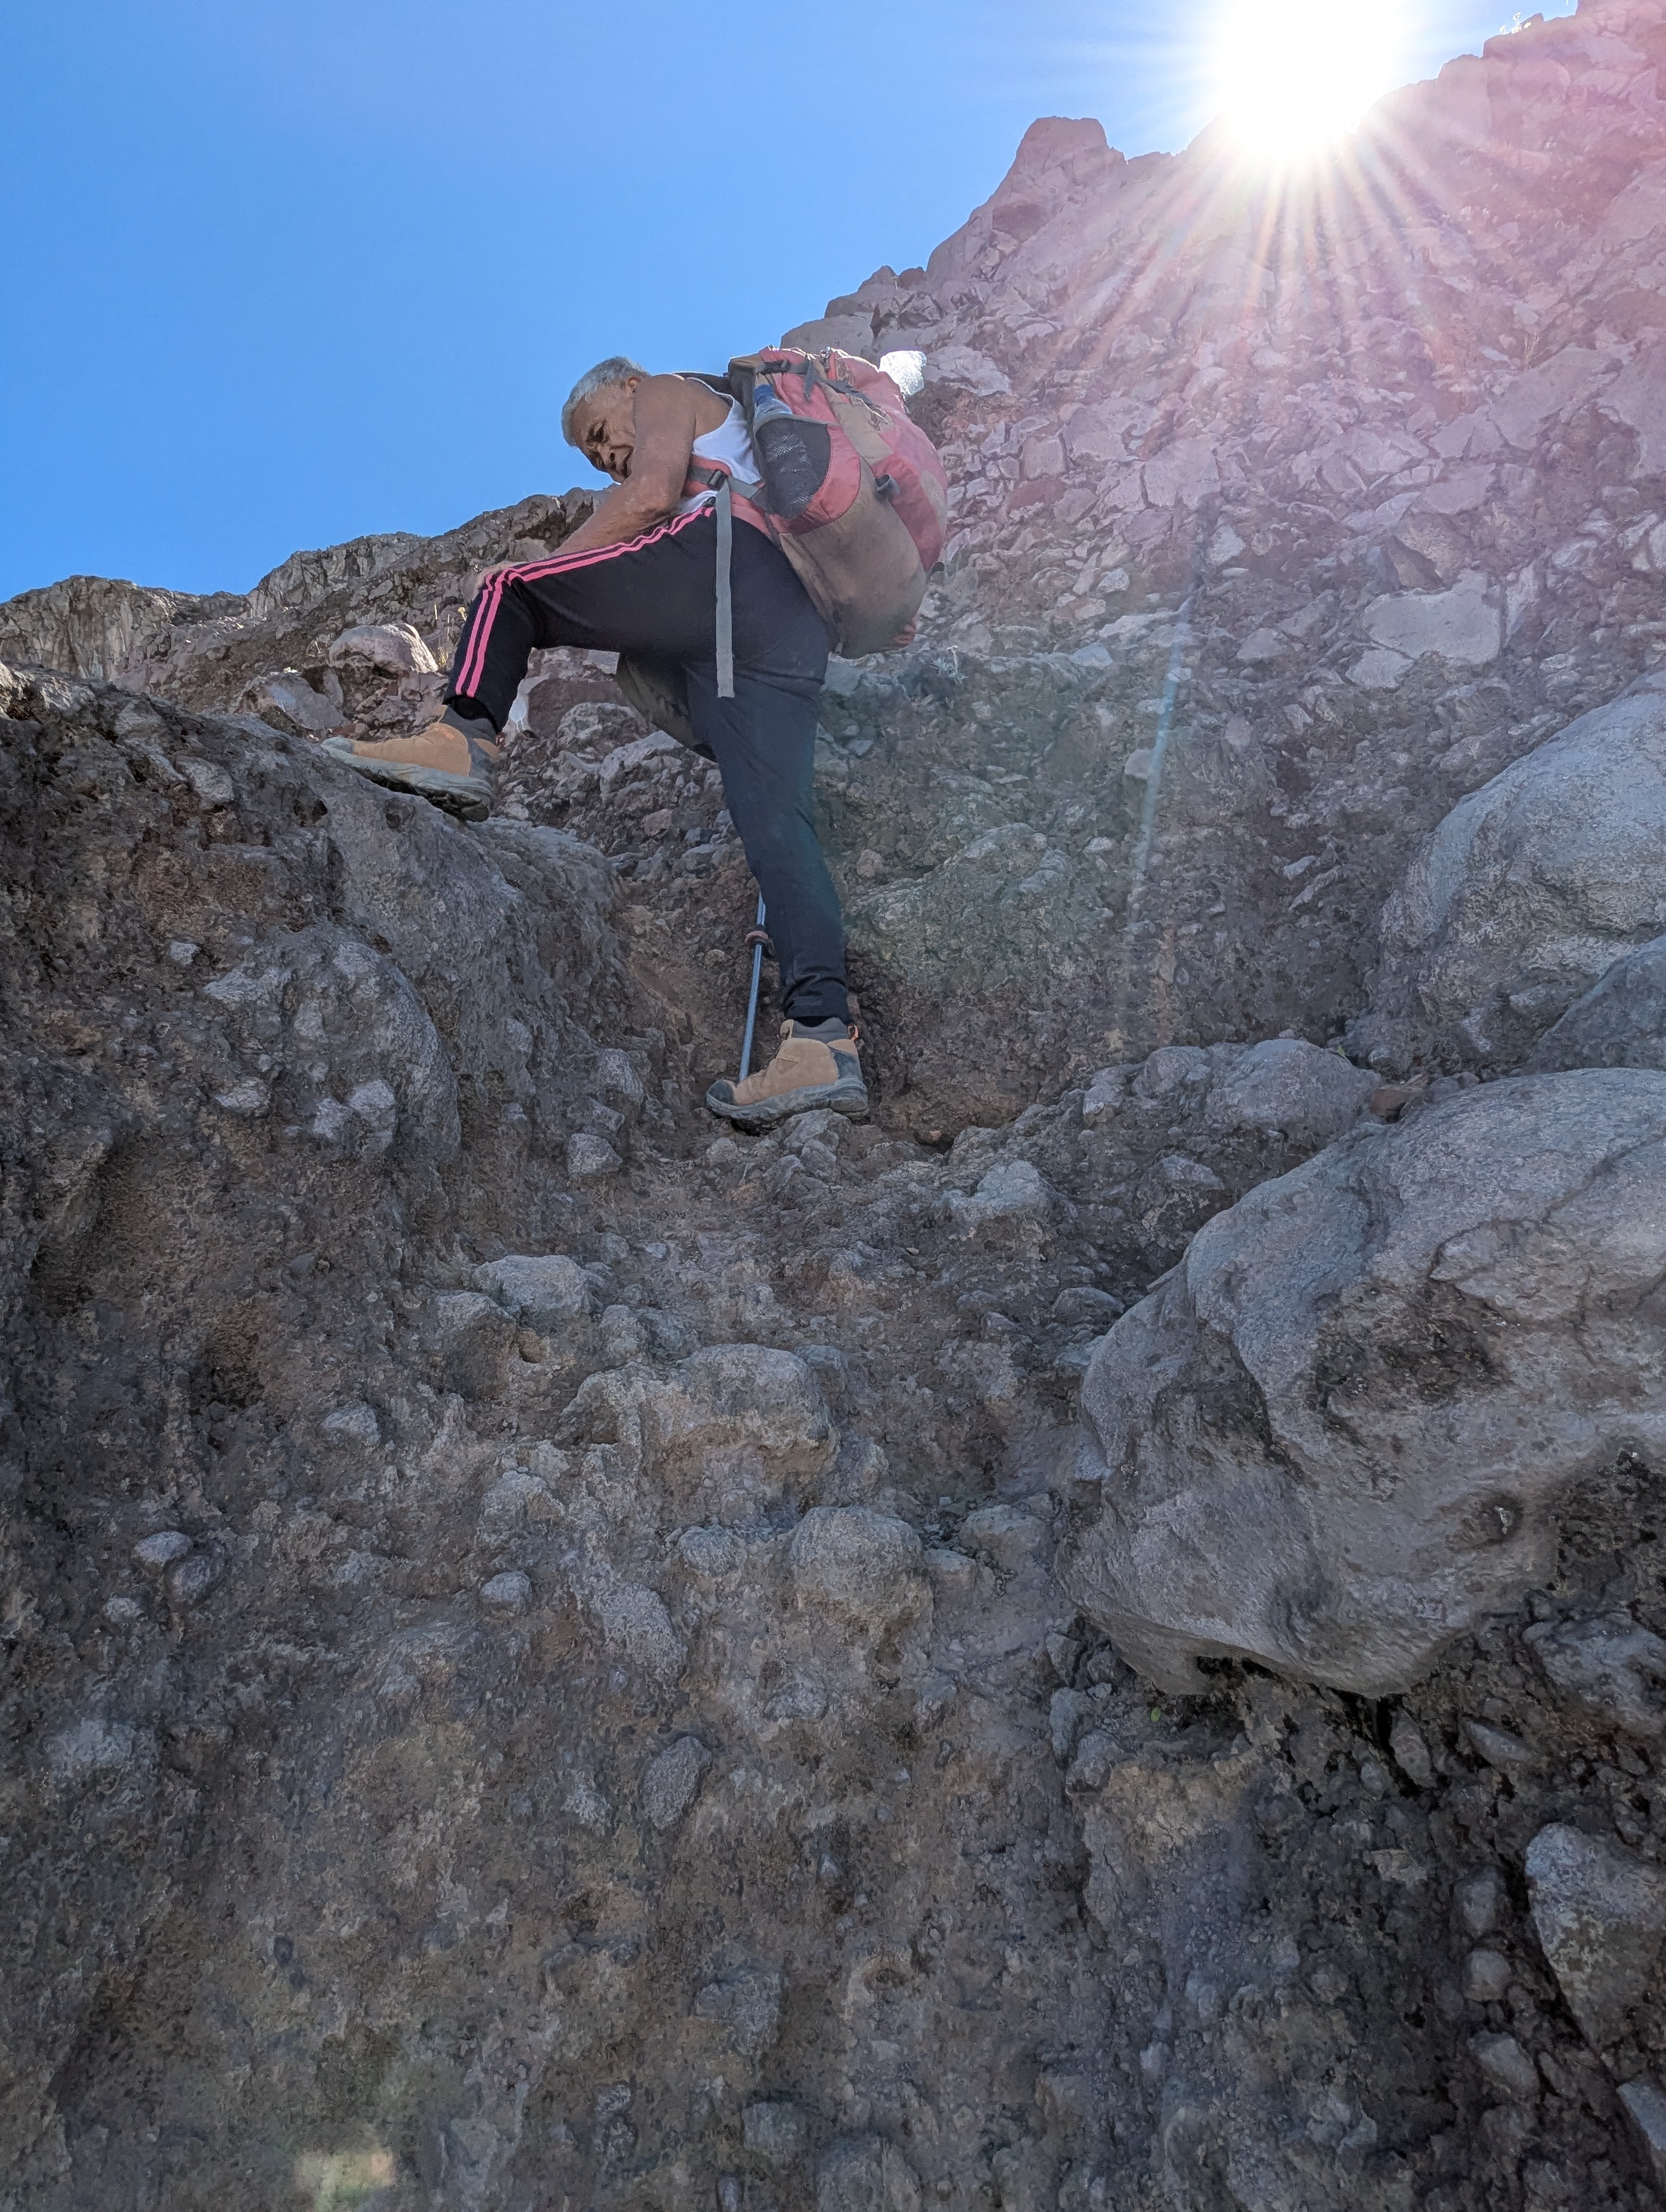
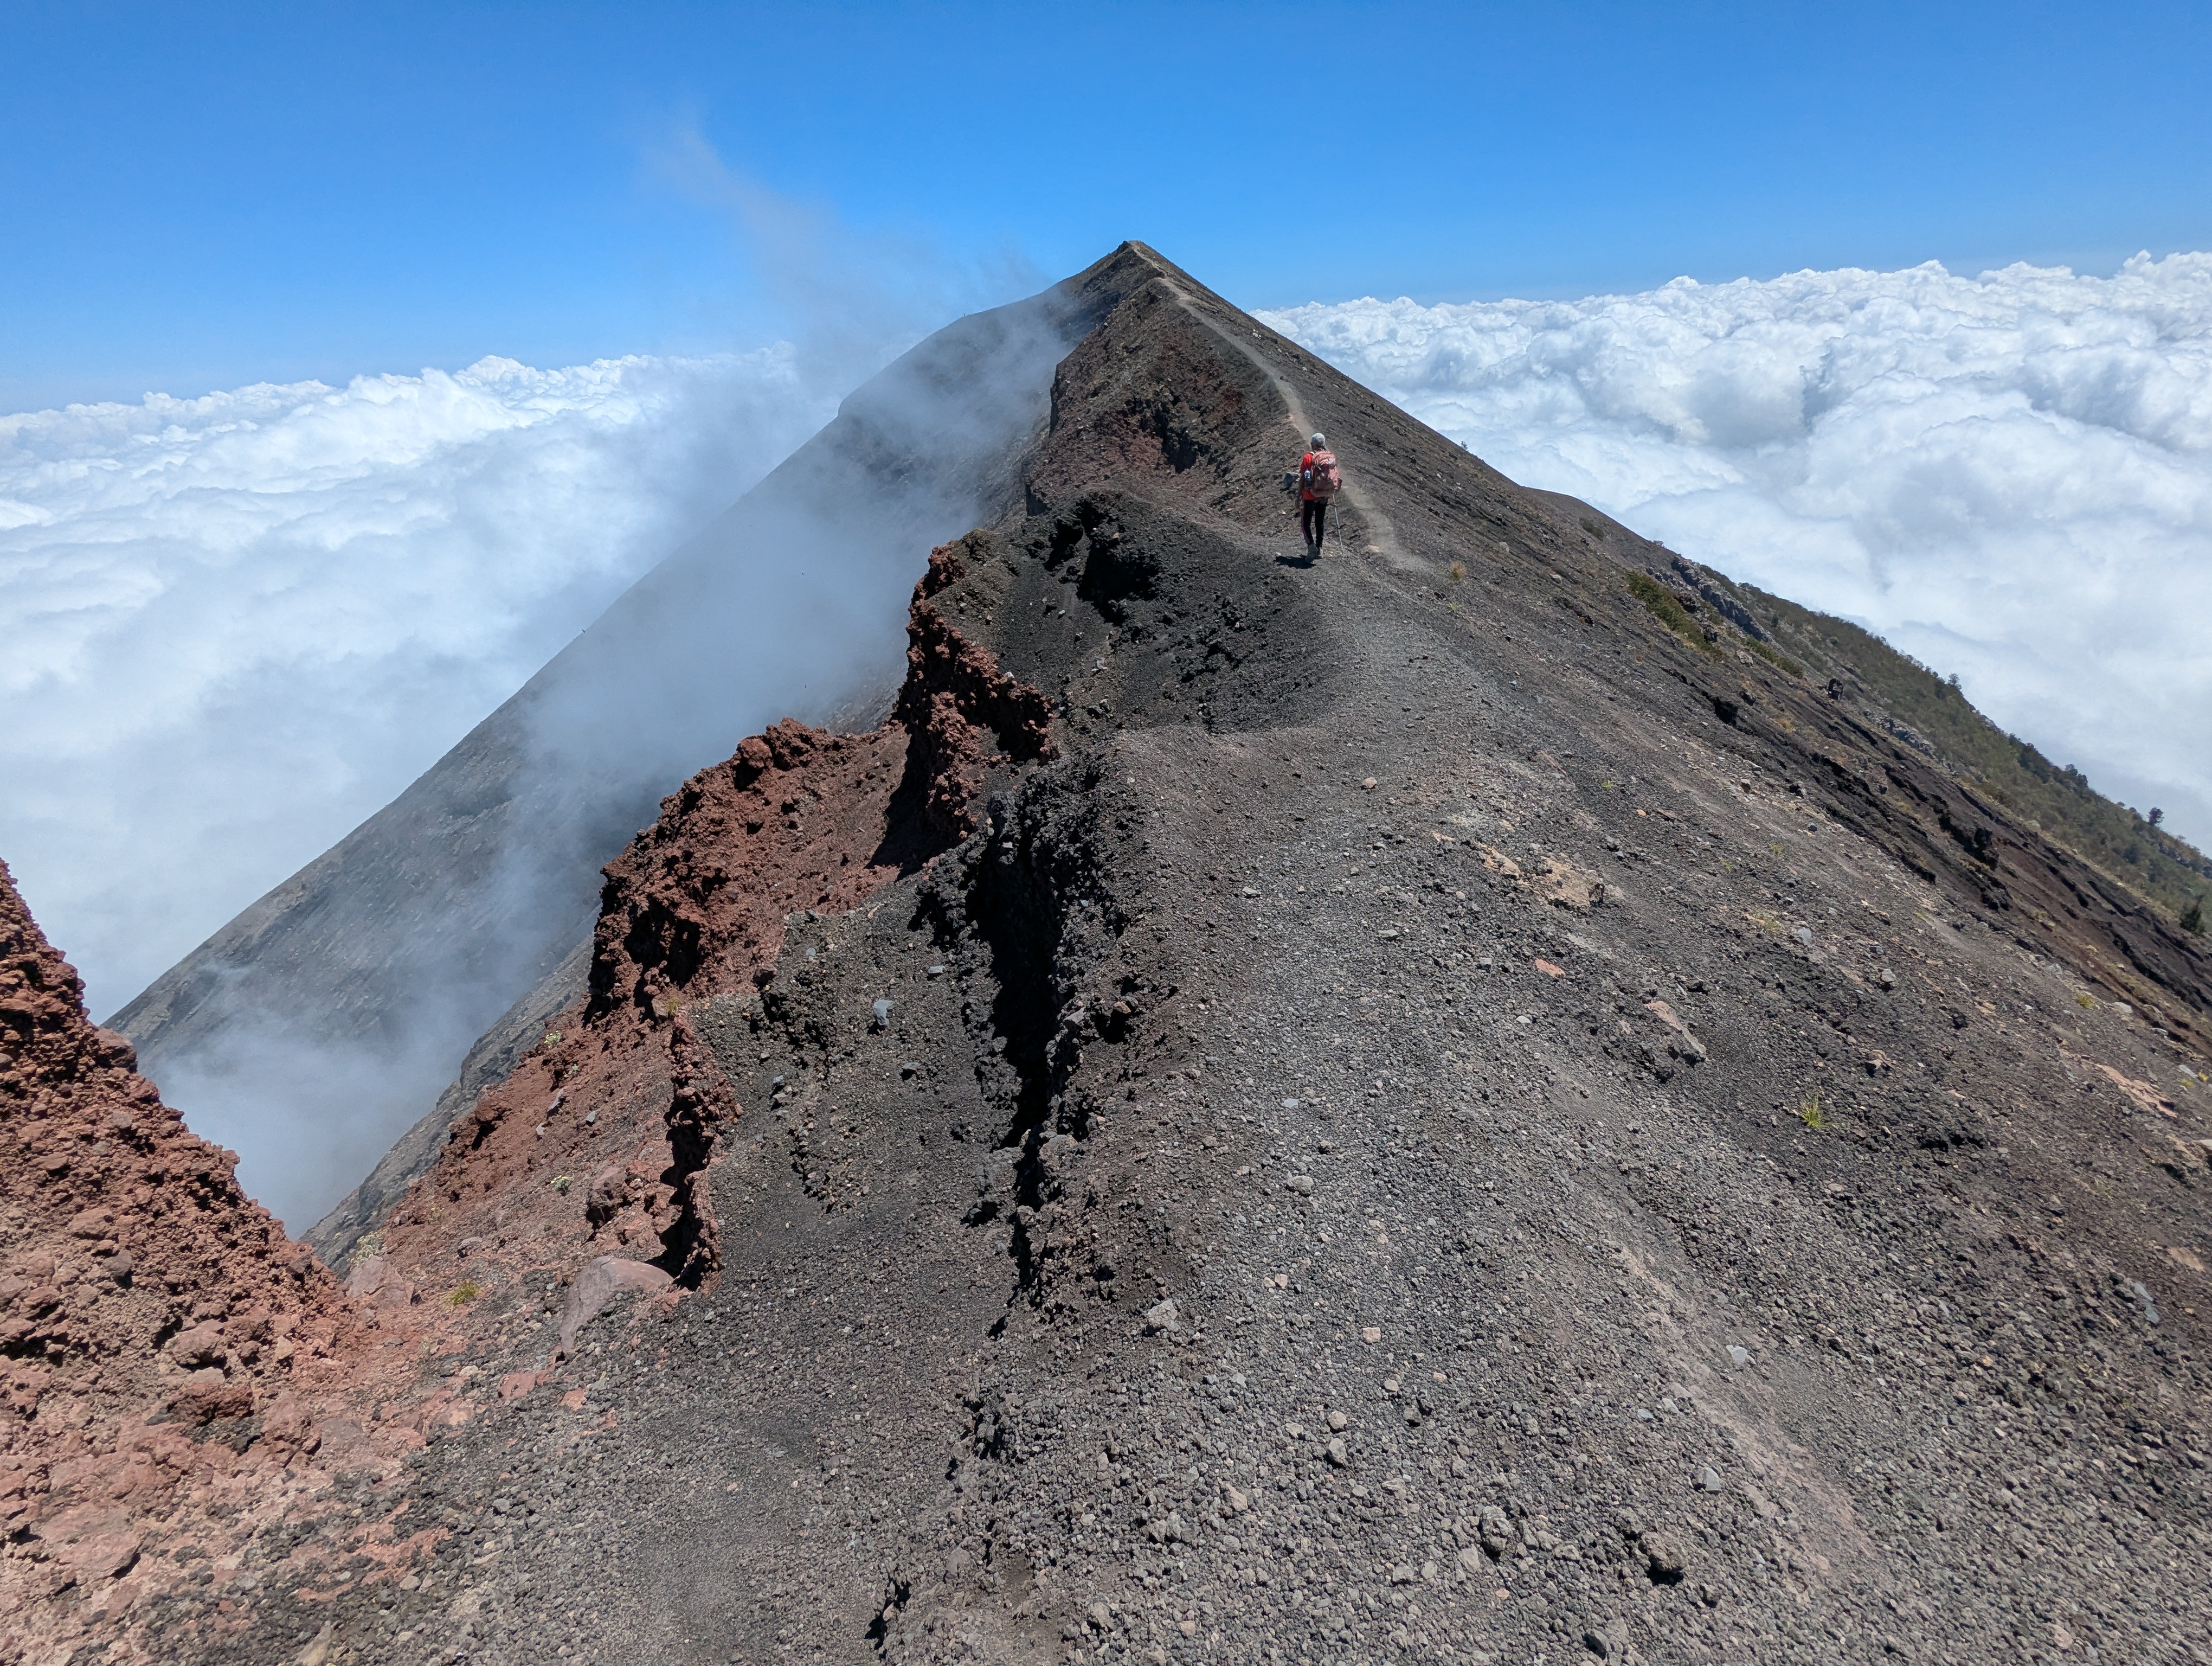
Rather than follow our path all the way to where it joined that ridge, my guide opted to take a more exciting shortcut by climbing a wall of rock a couple of meters high and then heading straight to the summit up a ~45 degree incline for the final 100 meters or so.
Ridge leading from summit to Besakih
Part way up we watched as someone at the summit accidentally dropped their water bottle and it bounced down the slope we were climbing, bouncing higher and further with each bounce, and continuing a long way down the mountain. It was only then that I really appreciated how dangerous a slip or fall could have been if not immediately brought under control. My guide later mentioned that another reason the sunrise trek is popular is because many people would be too scared to continue if they could see their surroundings during the ascent, and the darkness of the night shelters them from those views.
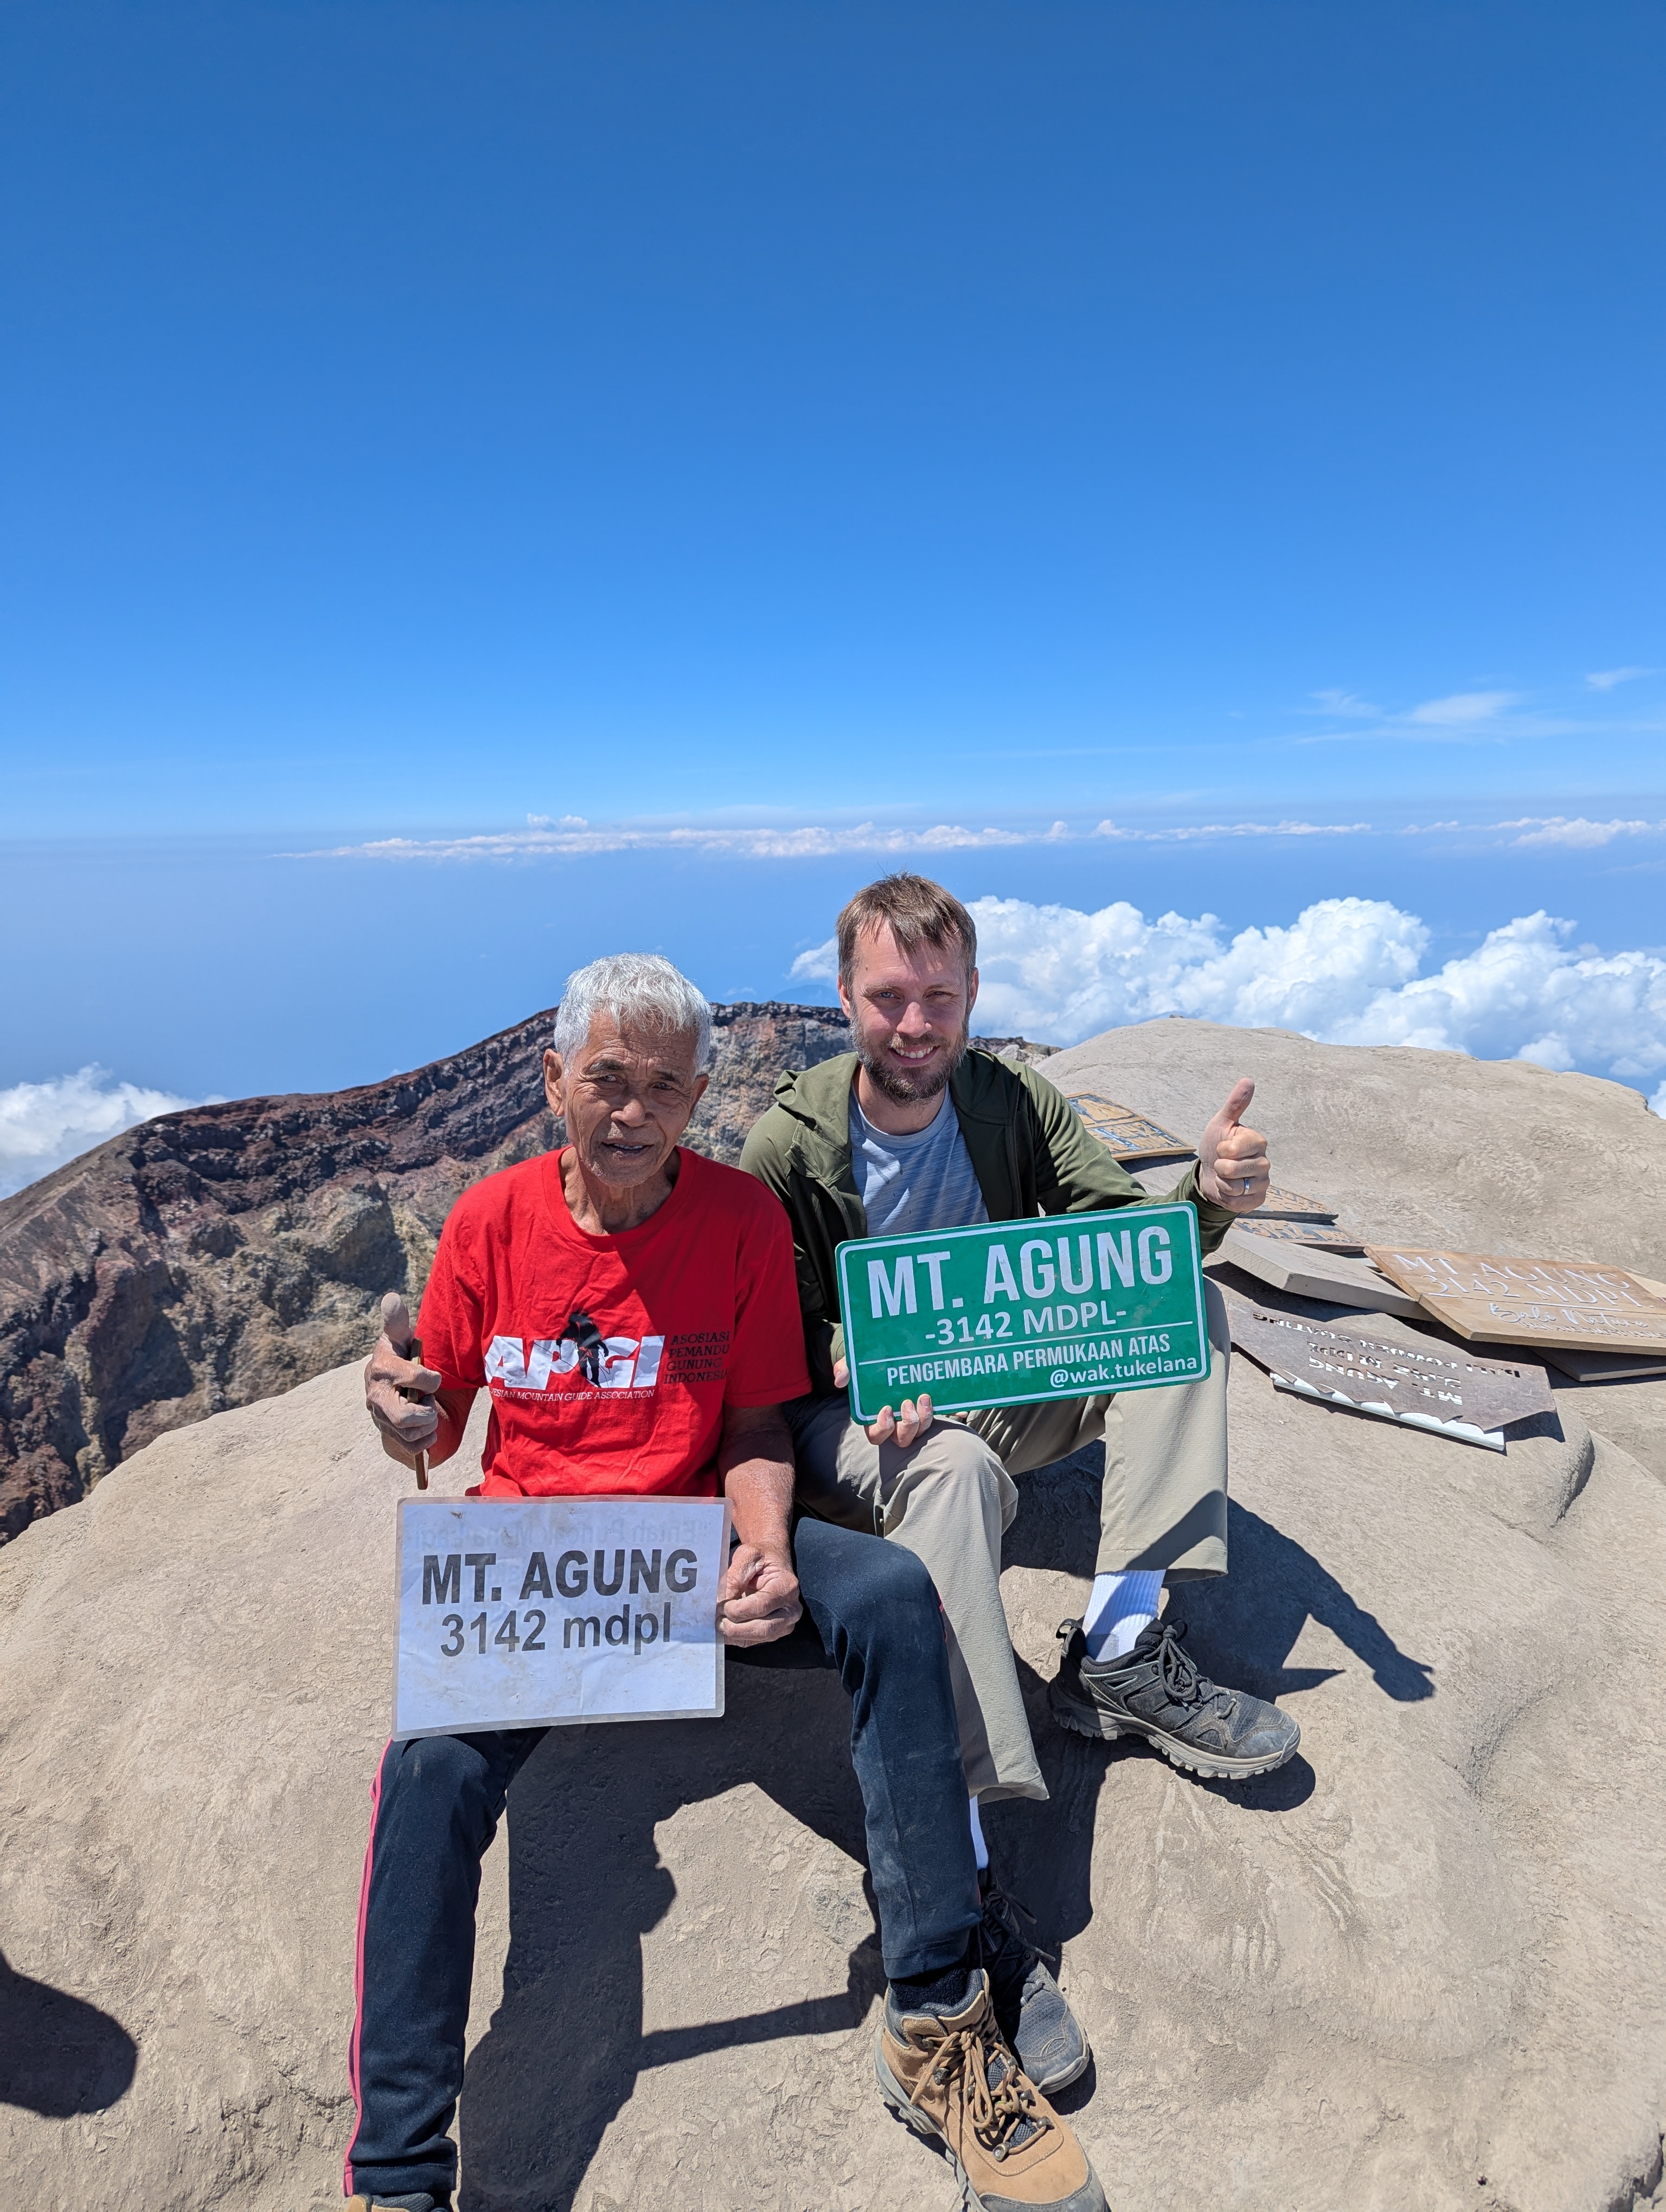
Me at the summit with Wayan Tegteg
When we reached the summit, one of the people we met there (all of whom had used the Besakih route) commented how challenging our path looked in comparison. At that point I was doubly pleased with my choice of route - that comment suggested it was the more exciting route up, but equally I thought to myself that there was no way I wanted to head back down the same way - the likelihood of slipping seemed far too great. It was just after midday when we reached the summit, so the ascent had taken about 6 hours. While I am sure I could have gone faster much of the time, I would have ended up exhausted and needing to take frequent breaks, so I think the slow and steady pace was much more sensible as I still felt good at the summit.
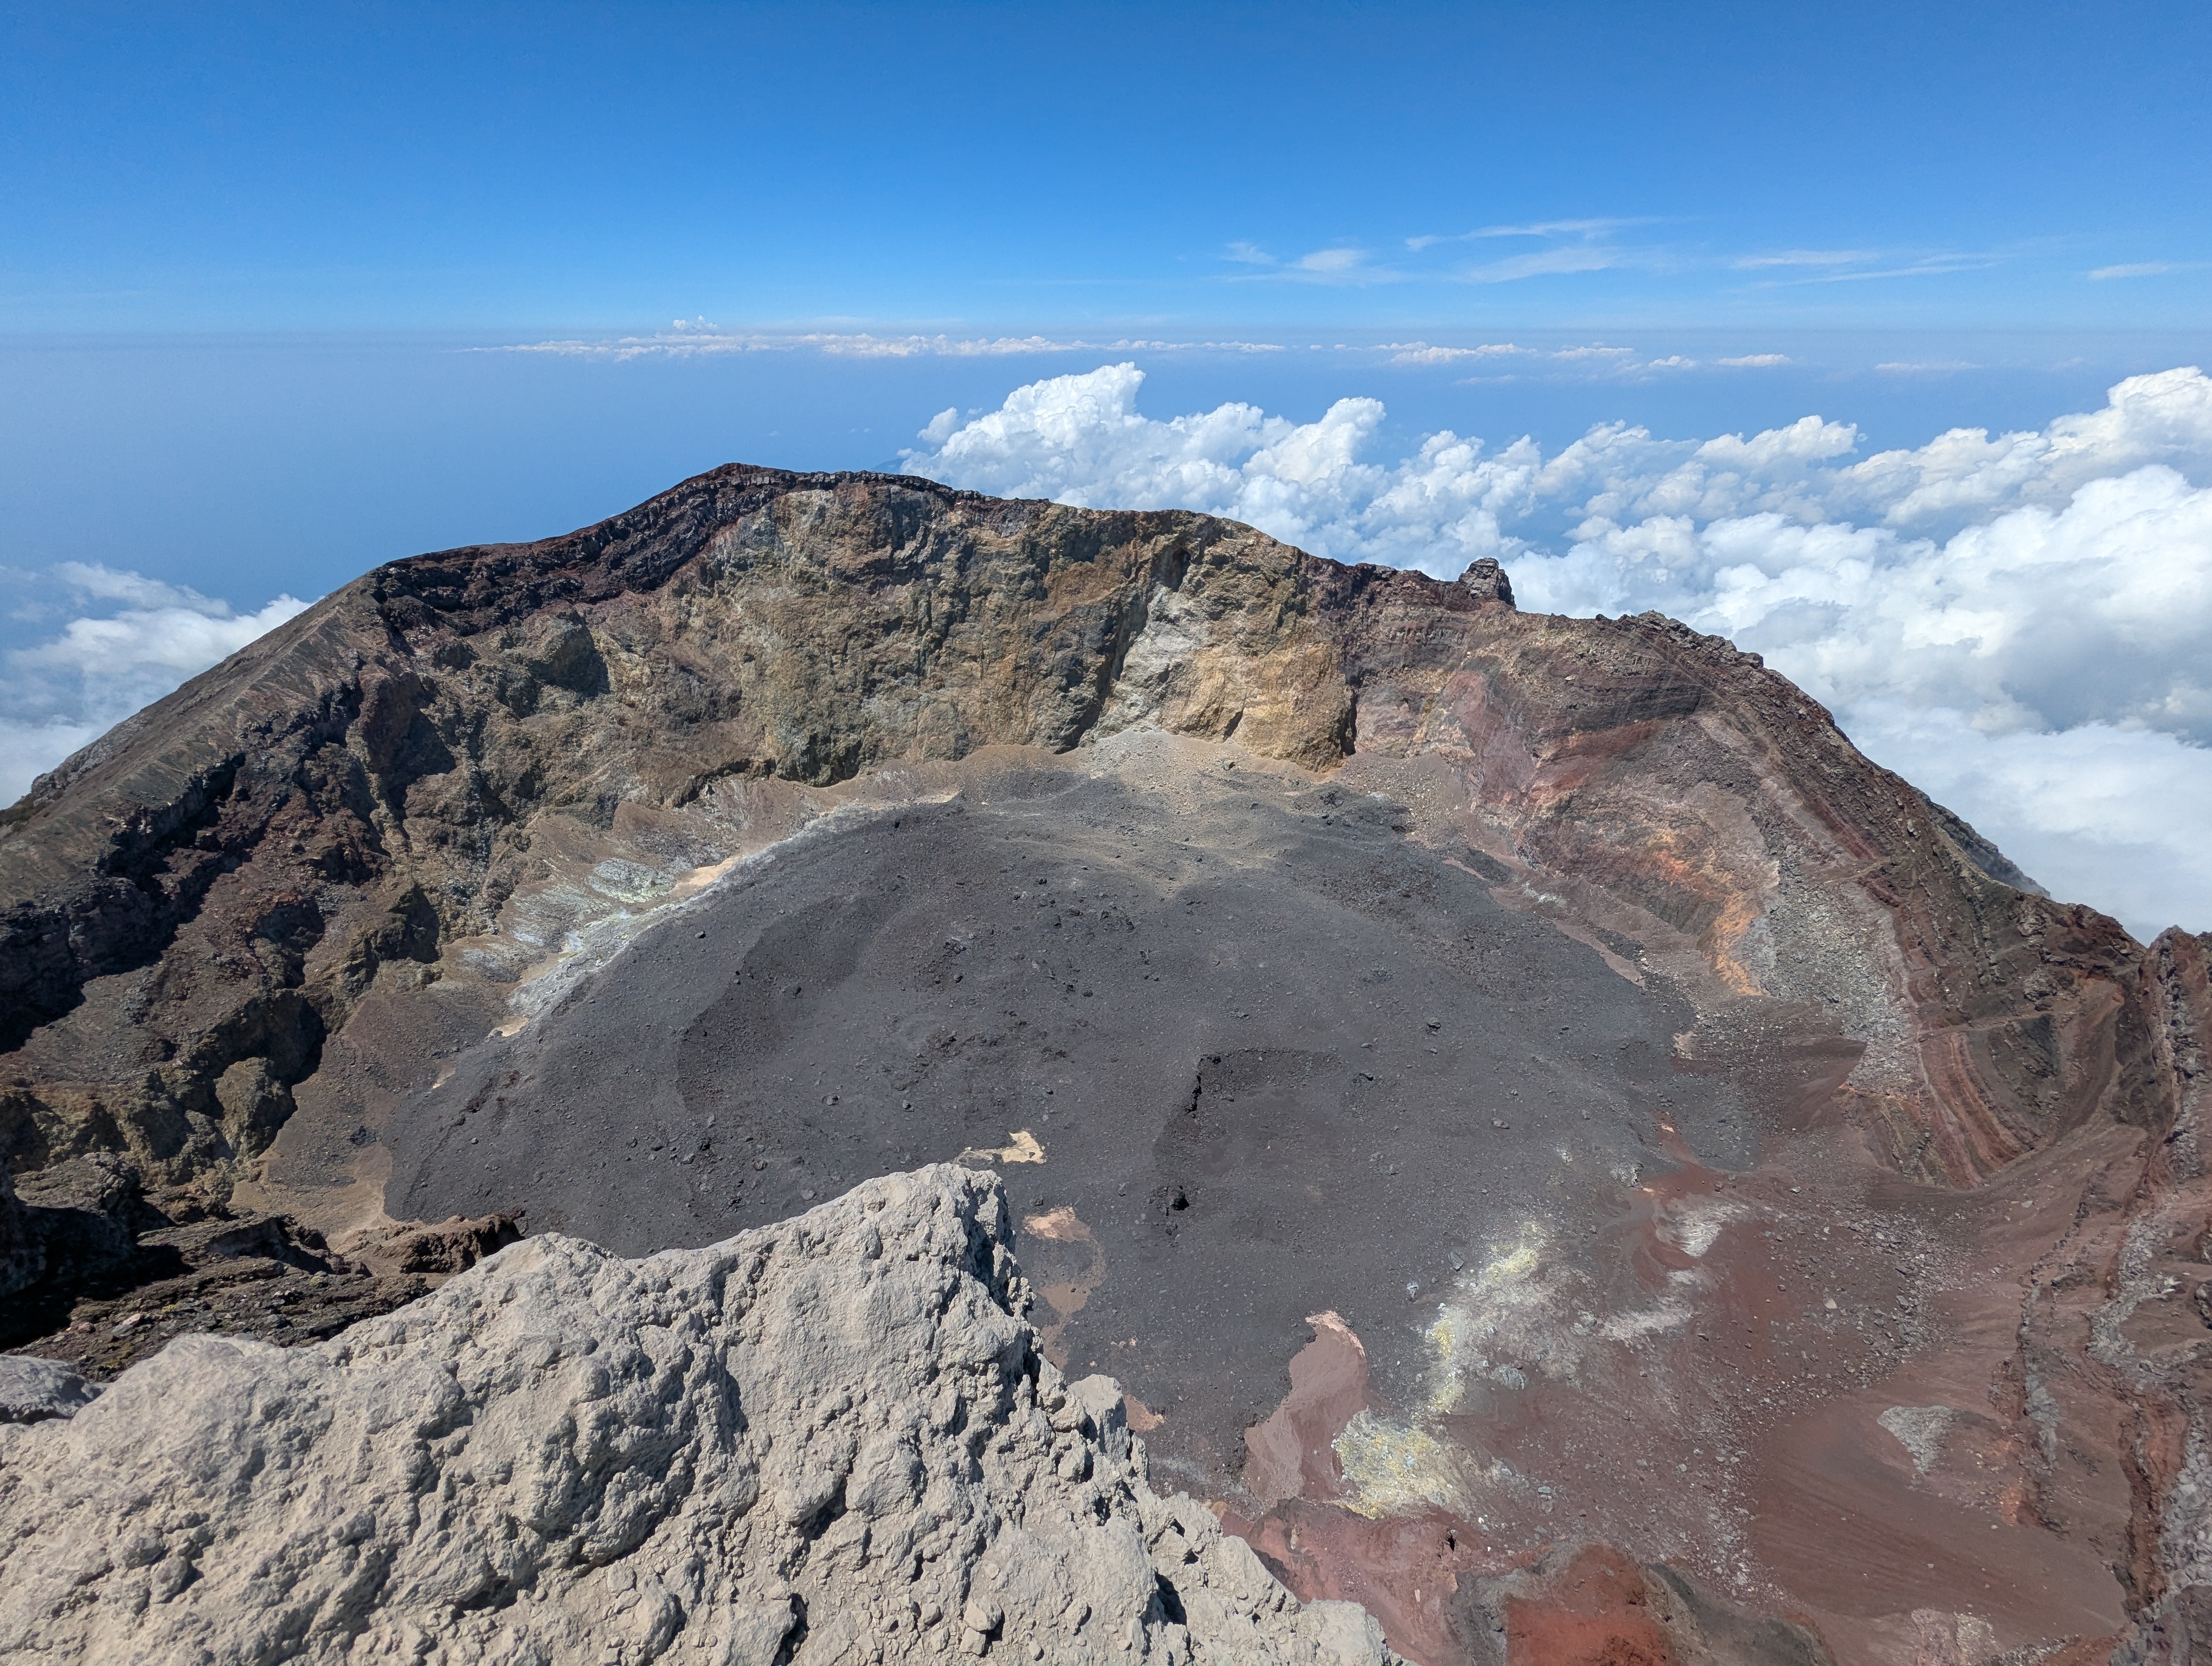
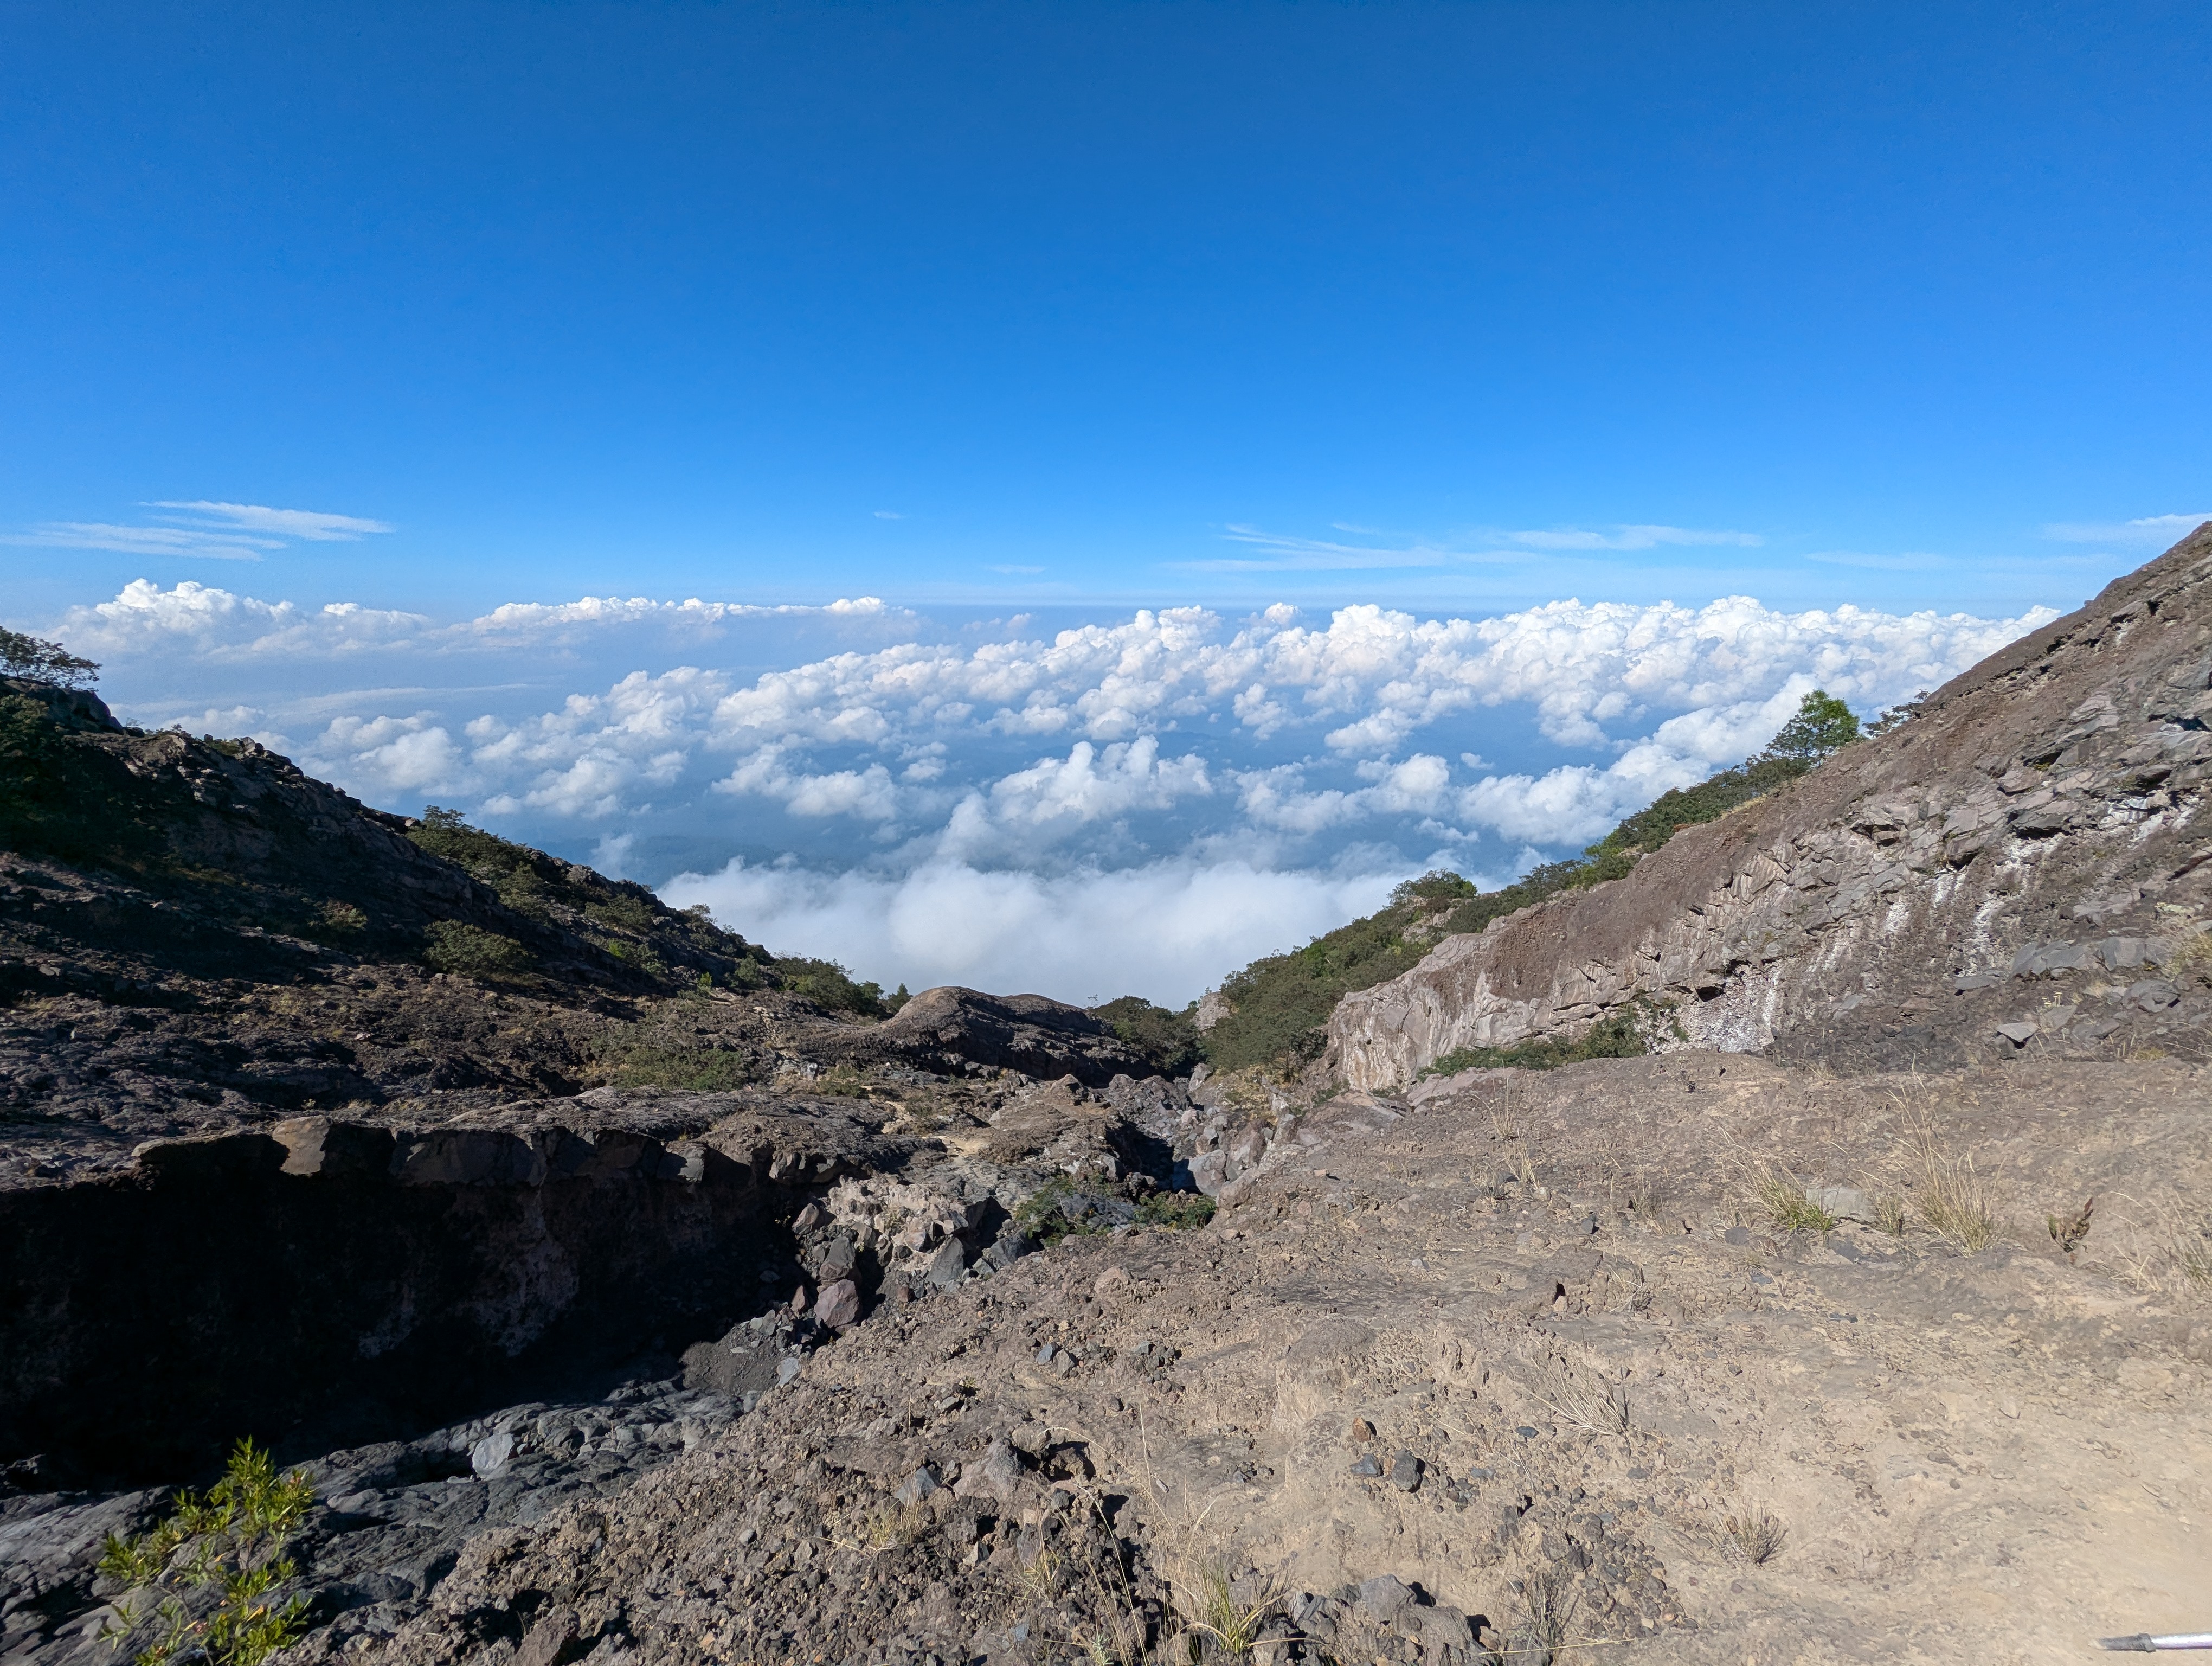
View inside crater from summit
We had been above the clouds for the entire climb, but the clouds had also been rising as we went up. So when we reached the summit, although the air around us was clear, most of the island below us was obscured by clouds. That was expected, but I wasn’t really bothered. What was more important to me at that point was the view of the crater itself, which was awesome, especially the fact two plumes of smoke could be seen rising from the northern edge of the inside of the crater. The clouds did part briefly on the northern side of the mountain, providing views of the island all the way to the sea in that direction.
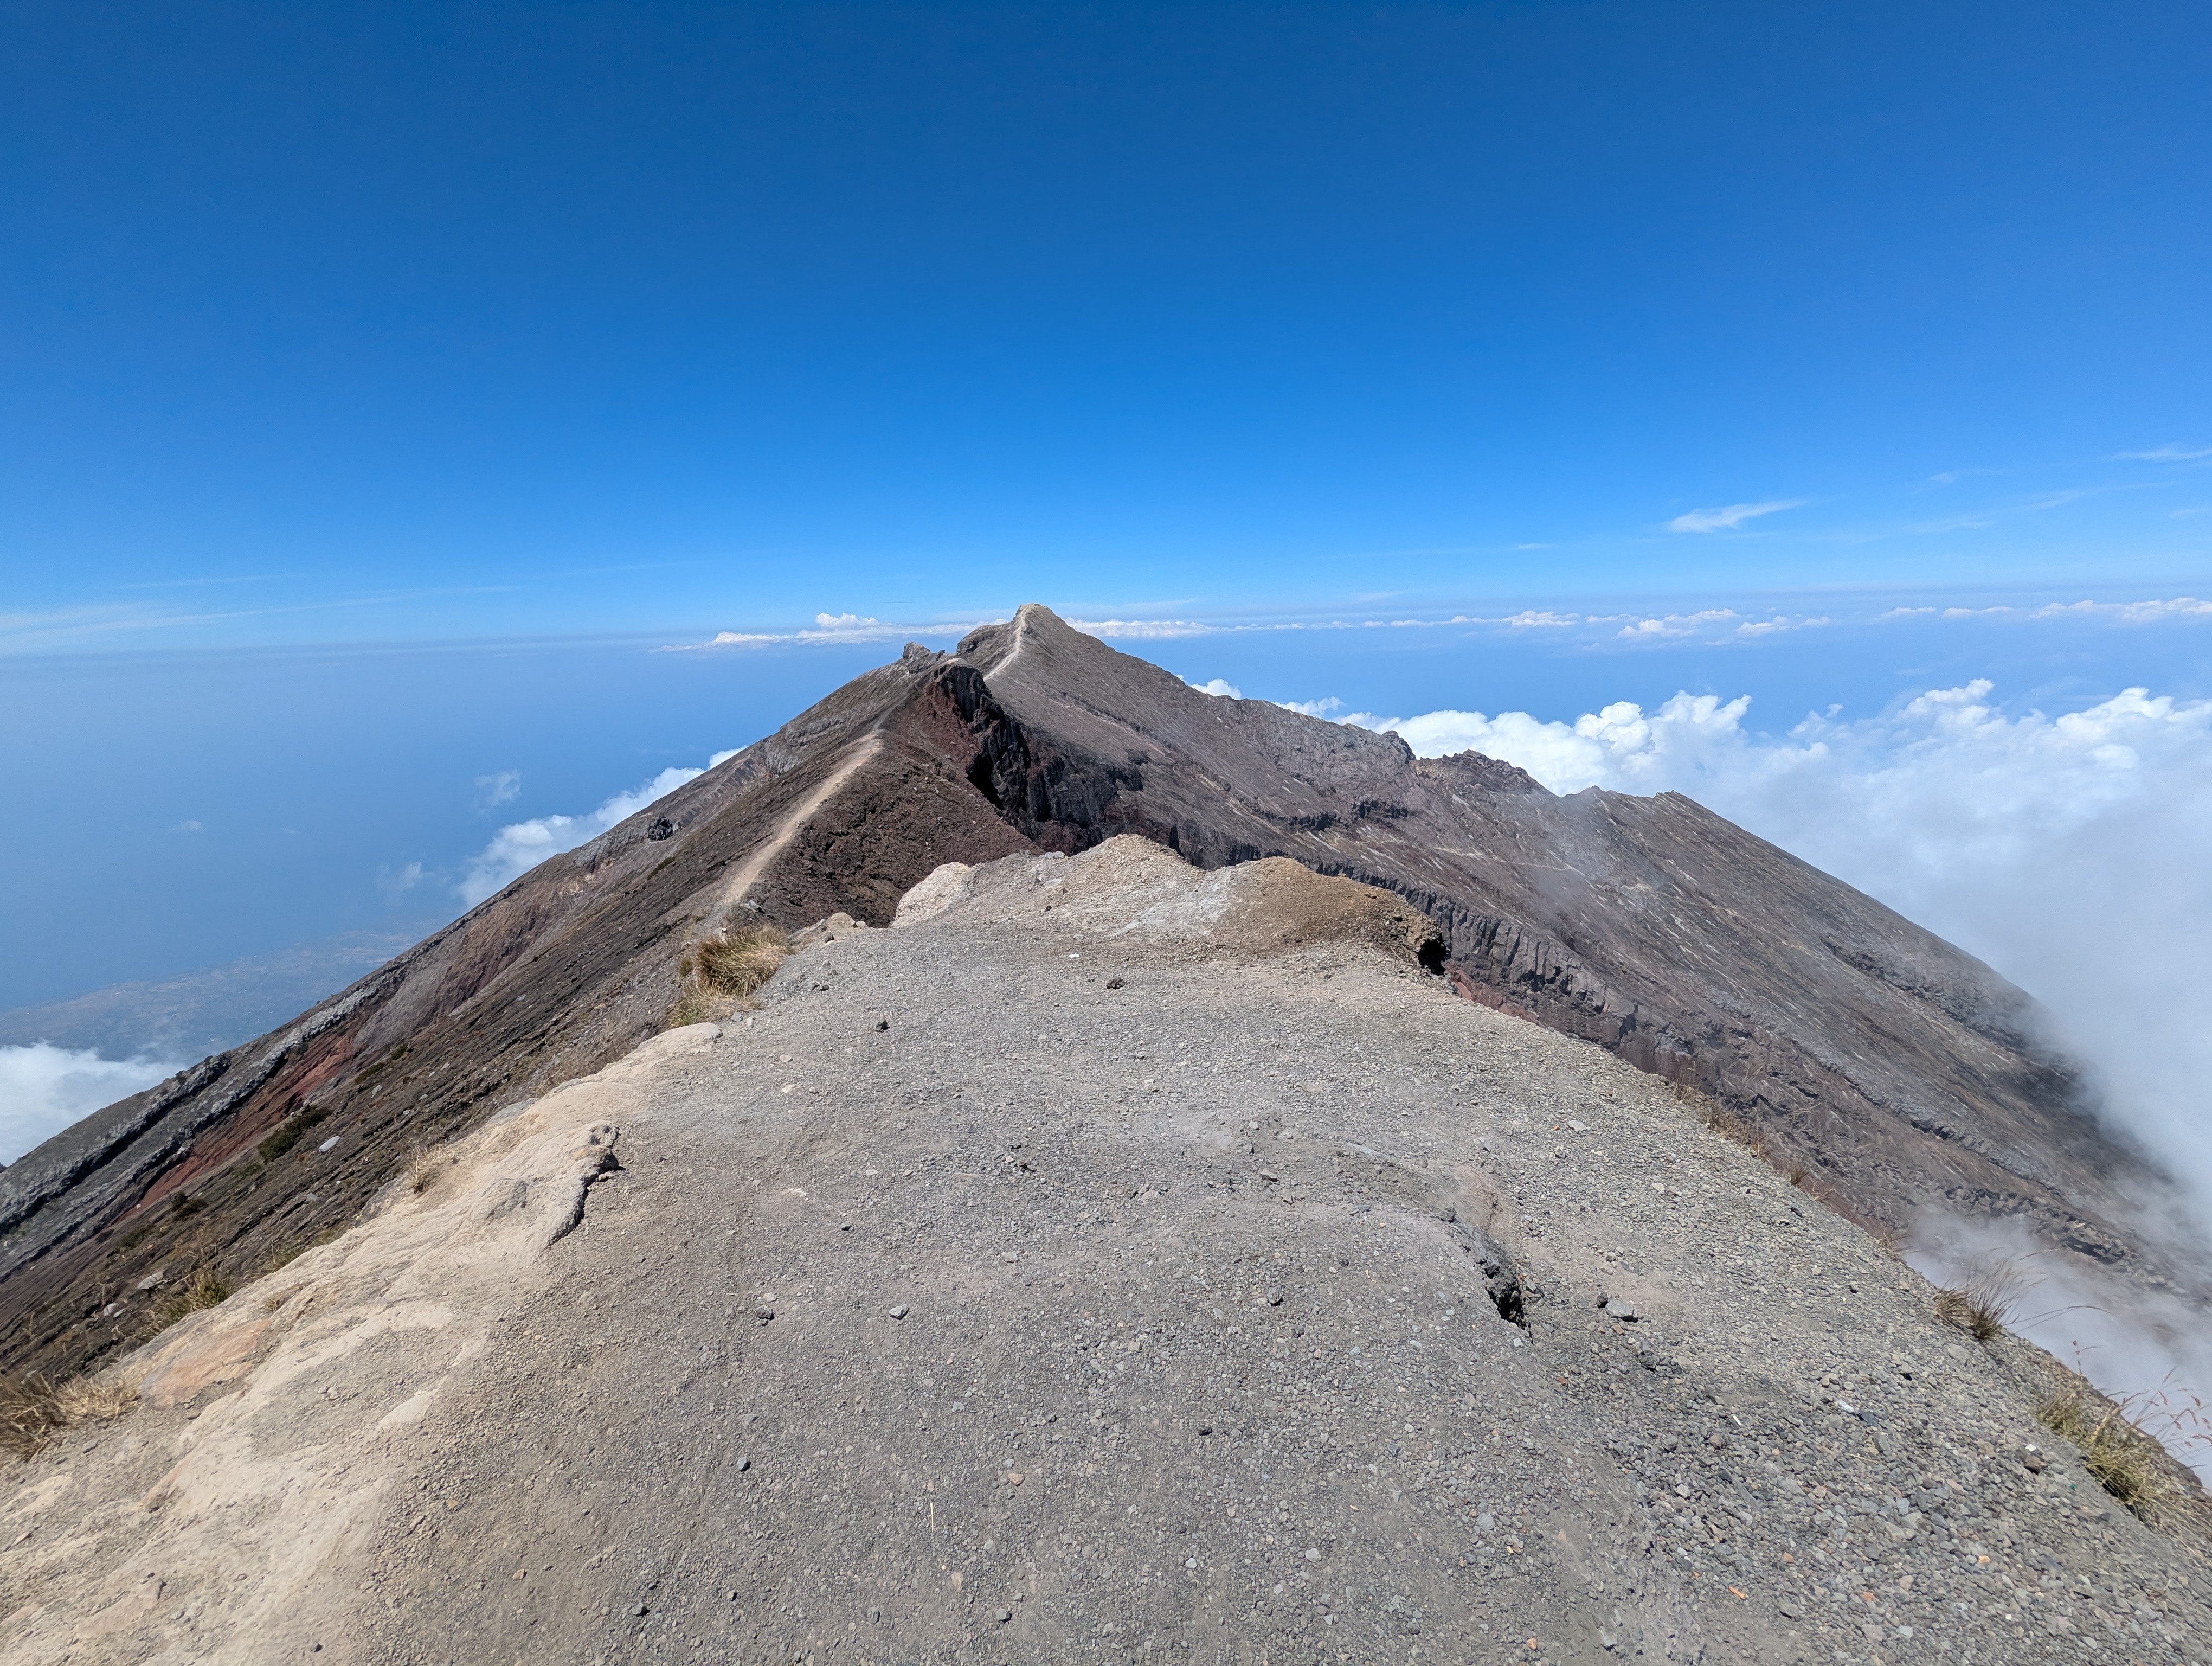
View of summit from Besakih route
One thing that has been frustrating me somewhat, even since before tackling the hike, is that it is not clear what the elevation of the summit really is. The numerous signs at the top all state that it is 3142m above sea level, but most of the sources I would normally trust online seem to say it is 3031m (for example wikipedia). That is quite a discrepancy, and an annoying one when I want to know how high I climbed on the most challenging hike I have ever done. One thing I have noticed is that the contour lines on pretty much all the topographic maps I have found online are blatantly completely wrong in their representation of the area around the summit. Not least because most of them show the summit as being in a position which the contour lines suggest is already part way down the slope towards the crater. But also the steep final slope that we used to reach the summit, which I estimated to be about a 45 degree incline for perhaps 100 meters or so, is shown by those topographic maps as being roughly flat (ie a single contour line follows the path we took). So I don’t trust any of those sources, all of which are ones that claim the summit is at 3031m. I did find a couple of references to elevation data from NASA taken by satellites, which state that the summit is 3148m. So I am currently leaning towards believing that the higher figure of either 3142m or 3148m is correct. But I wish I’d had a watch or other device with a trustworthy altimeter to provide a reading of my own that I could more readily believe - the EXIF data from the photos I took at the summit with my phone say they were at 3085m, but I don’t trust those readings as I know many of those values in my other photos are quite inaccurate. If anyone has more information on why there are two such different heights for Mount Agung stated in different places, and especially a convincing explanation for which one is accurate, I would love to hear it - please let me know!
Ridge heading down towards Besakih
The route back down towards Besakih started off very as a very gentle path along a spectacular ridge. After we reached the end of the ridge and had to begin the descent properly, we soon entered the clouds, and thus for the majority of the descent the visibility was much more limited. Having said that, it wasn’t long before we reached the trees again, at which point they would have obscured most of the views anyway. Despite not being quite as steep as the Pura Pasar Agung route, the descent required a lot of concentration and careful choice of where to place each footstep in order to avoid slipping. I was comfortable with the sections early on with a plentiful cushion of scree, but it became more difficult later as the scree was replaced by loose dirt and just the odd larger stone or two. I found myself relying heavily on the pole to keep myself from slipping without having to crouch down to use my hands directly, to the extent that my arm began to get tired.
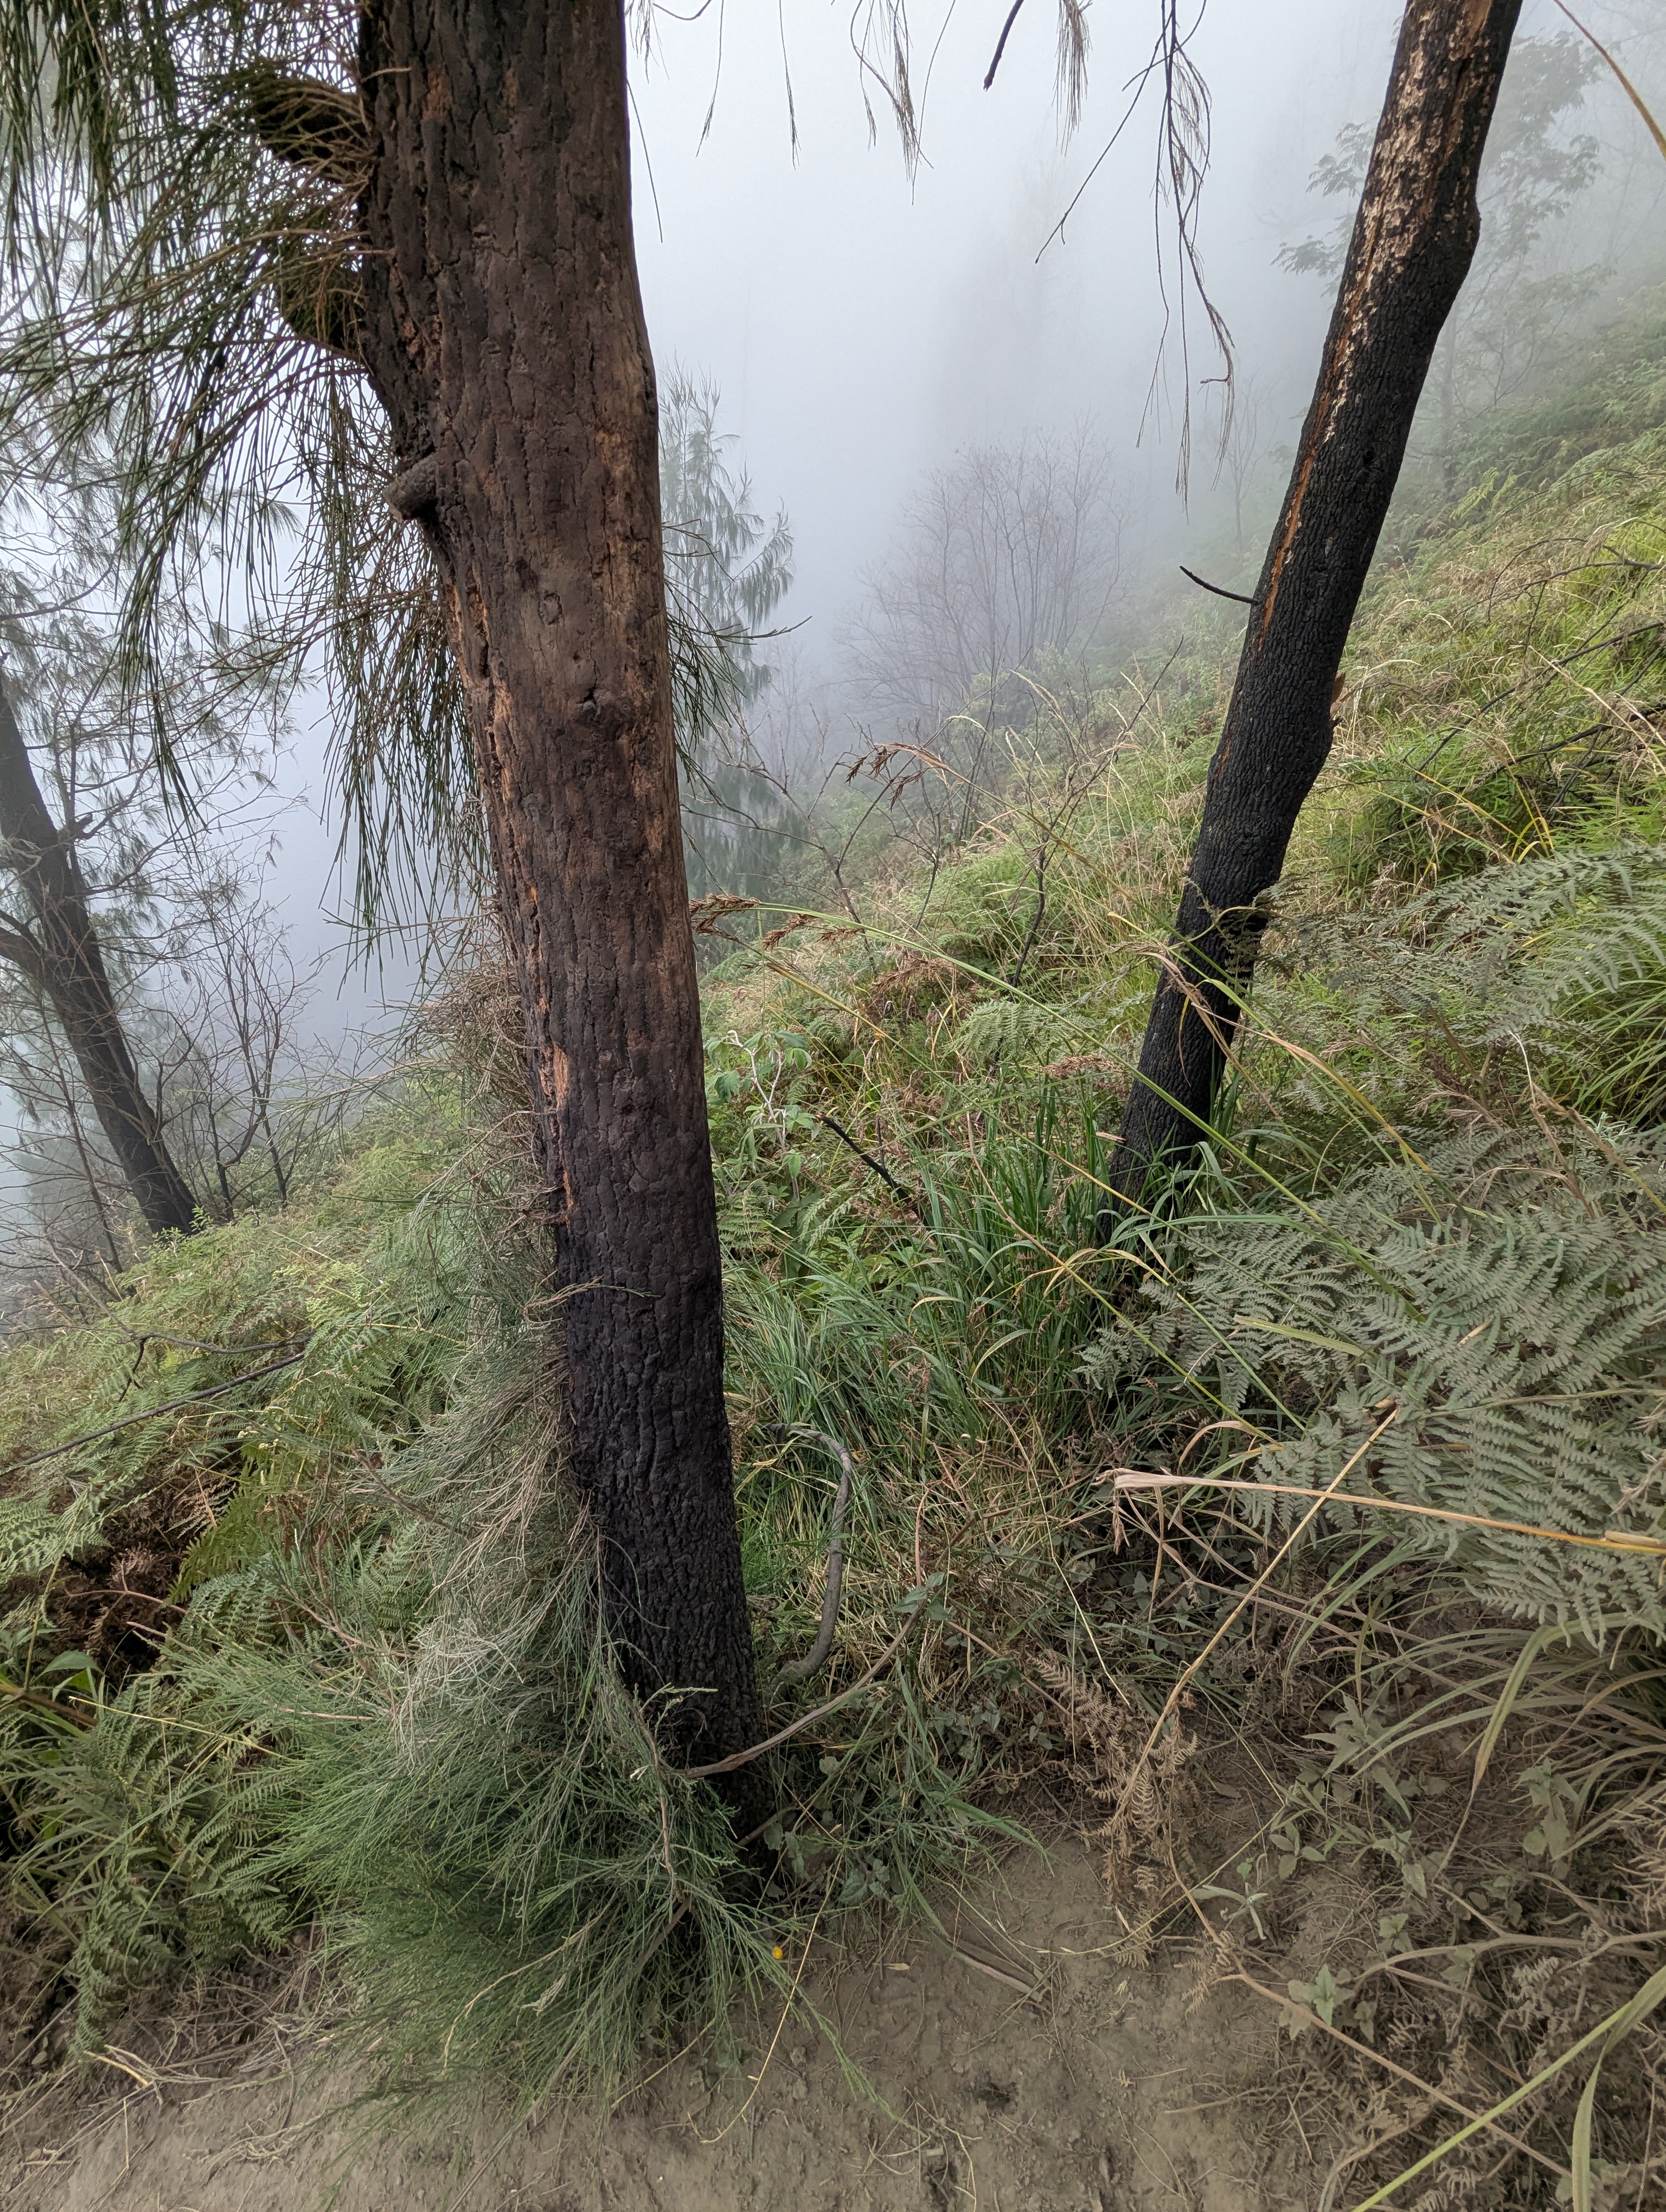
Trees partially scorched and charcoal-like
As we descended into ever denser jungle, it became possible to use trees (roots, branches, and trunks) to prevent slipping, and sometimes simply grabbing onto nearby plants. It was essential to use all available handholds as the path remained very steep and slippery, while my legs became ever more tired. I narrowly avoided landing on my backside countless times. And the ground either side of the path dropped away extremely rapidly much of the time - any slip or fall that resulted in leaving the path could have had very unpleasant consequences. My hands were so dirty from grabbing onto the charcoal on tree trunks presumably scorched during previous eruptions that I could no longer unlock my phone to take photos as it wouldn’t recognise my fingerprints. The route down towards Besakih seemed to never end - it was surprisingly long and unforgiving.
About two thirds of the way down the clouds became mist, and then turned into a downpour. At first the tree cover protected us from much of the rain, but that didn’t last forever. Unfortunately I had misjudged my clothing and brought a warm jacket rather than a waterproof one, so I opted to leave the jacket off and accept that I would get wet. After an hour and a half in the pouring rain I was absolutely soaked by the end of the hike - kind of fun in a strange way, but at least the rain was only at the end of the hike and not earlier on. I don’t think the rain made the descent any more difficult - it just turned the loose dirt into mud, which was a nice change but probably about equally slippery.
About 1 mile from the end was a guide hut with shelter, a roaring fire, and a couple of motorcycles. My guide said that if I was tired and wanted to skip the final section we could pay for rides down on the back of the bikes. But not only was I still able and determined to complete the hike on foot, I was also terrified by the idea of trying to hold on to the back of a motorcycle going down a steep, muddy, bumpy, narrow and winding dirt trail through the jungle in the pouring rain whilst very tired. So that was a definite “no”. We got to the end of the hike at just after 5pm, so 11 hours of hiking in total including breaks - the descent had taken about 4.5 hours. Unlike the ascent, I could not have gone down any faster than that without constantly slipping and falling over, and possibly injuring myself. We passed a few others going a little slower than us on the way down, but were also passed by a couple of far more daring people practically running down, although I think they were other (younger) guides.
It’s crazy to think that the entire walk was only about 6 miles, yet took 11 hours, but that’s really just a reflection of how steep and difficult the path was. Even if you argue that the continual zig-zagging required in order to reduce the incline and chance of slipping might increase the effective length to more like 10 miles, that’s still under 1 mph on average.
I had pre-booked a massage for the following day, which turned out to be a mistake as my legs hurt more after the massage than beforehand. I recommend waiting at least a few days before having a massage! It took almost a week before the aching in my thighs had entirely subsided. Meanwhile my guide was back up at the summit with another client just 2 days later!
For a better idea of what the Besakih route is like (especially since most of my photos are from my ascent on the Pasar Agung route), and views of the summit area from a drone, I recommend checking out this video: https://youtu.be/eW2d4qTX0Zs?si=C_gAhHubAXtVcqP9